Kivy es una herramienta GUI independiente de la plataforma en Python. Como se puede ejecutar en Android, IOS, Linux y Windows, etc. Básicamente se usa para desarrollar la aplicación de Android, pero eso no significa que no se pueda usar en aplicaciones de escritorio.
????????? Tutorial de Kivy: aprenda Kivy con ejemplos .
Control deslizante:
para trabajar con el control deslizante, primero debe importar el módulo que consta de todas las características, funciones del control deslizante, es decir
Module: kivy.uix.slider
El control deslizante se parece al mismo que usamos en Android para aumentar el brillo, el volumen, etc. Admite orientaciones horizontales y verticales, valores mínimos/máximos y un valor predeterminado. Kivy admite varias opciones de widgets deslizantes para personalizar el cursor, la imagen del cursor, el borde, el fondo para usar en diferentes orientaciones, la región entre el valor mínimo y el valor máximo.
Kivy también admite negociar en términos de valor normalizado (rango de 0 a 1) en lugar de los rangos reales admitidos por el control deslizante.
Enfoque básico a seguir al crear el control deslizante:
1) importar kivy
2) importar la aplicación kivy
3) importar el diseño de la cuadrícula (no es obligatorio según la necesidad)
4) importar la etiqueta (no es obligatorio según la necesidad)
5) importar el control deslizante
6) importar la propiedad numérica
7) establecer la versión mínima (opcional)
8) Extender la clase
9) Agregar y devolver un widget
10) Ejecutar una instancia de la clase
A continuación se muestra el código que implementa el control deslizante:
Python3
# import kivy module
import kivy
# this restrict the kivy version i.e
# below this kivy version you cannot
# use the app or software
kivy.require("1.9.1")
# Kivy Example App for the slider widget
from kivy.app import App
# The GridLayout arranges children in a matrix.
from kivy.uix.gridlayout import GridLayout
# If we will not import this module
# It will through the error
from kivy.uix.slider import Slider
# The Label widget is for rendering text.
from kivy.uix.label import Label
# Property that represents a numeric value
# within a minimum bound and / or maximum
# bound – within a numeric range.
from kivy.properties import NumericProperty
# class in which we are defining the
# sliders and its effects
class WidgetContainer(GridLayout):
def __init__(self, **kwargs):
# super function can be used to gain access
# to inherited methods from a parent or sibling
# class that has been overwritten in a class object.
super(WidgetContainer, self).__init__(**kwargs)
# 4 columns in grid layout
self.cols = 4
# declaring the slider and adding some effects to it
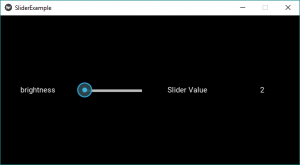
self.brightnessControl = Slider(min = 0, max = 100)
# 1st row - one label, one slider
self.add_widget(Label(text ='brightness'))
self.add_widget(self.brightnessControl)
# 2nd row - one label for caption,
# one label for slider value
self.add_widget(Label(text ='Slider Value'))
self.brightnessValue = Label(text ='0')
self.add_widget(self.brightnessValue)
# On the slider object Attach a callback
# for the attribute named value
self.brightnessControl.bind(value = self.on_value)
# Adding functionality behind the slider
# i.e when pressed increase the value
def on_value(self, instance, brightness):
self.brightnessValue.text = "% d"% brightness
# The app class
class SliderExample(App):
def build(self):
widgetContainer = WidgetContainer()
return widgetContainer
# creating the object root for ButtonApp() class
root = SliderExample()
# run function runs the whole program
# i.e run() method which calls the
# target function passed to the constructor.
root.run()
Producción:
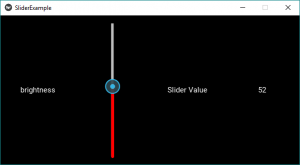
Para agregar algo de estilo y color al control deslizante, simplemente reemplace la línea n. ° 42 con la siguiente y agregue algunas características nuevas también si lo desea. Para el texto, el estilo utiliza los comandos adecuados en la parte del texto.
Python3
# declaring the slider and adding some effects to it
# By default its orientation is horizontal
# if want to change to vertical do like below
        self.brightnessControl = Slider(min = 0, max = 100,
                                        orientation ='vertical',
                                        value_track = True,
                                        value_track_color =[1, 0, 0, 1])
Producción:
Video para explicar cómo funciona el control deslizante –
Publicación traducida automáticamente
Artículo escrito por YashKhandelwal8 y traducido por Barcelona Geeks. The original can be accessed here. Licence: CCBY-SA