Hemos discutido recorridos iterativos en orden y preorden iterativos . En esta publicación, se analiza el recorrido iterativo posterior al orden, que es más complejo que los otros dos recorridos (debido a su naturaleza de recursividad sin cola) ., hay una declaración adicional después de la última llamada recursiva a sí mismo). Sin embargo, el recorrido posterior al pedido se puede hacer fácilmente usando dos pilas. La idea es empujar el recorrido de orden posterior inverso a una pila. Una vez que tengamos el recorrido de orden posterior invertido en una pila, podemos sacar todos los elementos uno por uno de la pila e imprimirlos; este orden de impresión será posterior debido a la propiedad LIFO de las pilas. Ahora la pregunta es cómo obtener elementos de orden posterior invertido en una pila: la segunda pila se usa para este propósito. Por ejemplo, en el siguiente árbol, necesitamos obtener 1, 3, 7, 6, 2, 5, 4 en una pila. Si echamos un vistazo más de cerca a esta secuencia, podemos observar que esta secuencia es muy similar al recorrido previo al pedido. La única diferencia es que el niño derecho es visitado antes que el izquierdo, y por lo tanto la secuencia es «raíz derecha izquierda» en lugar de «raíz izquierda derecha». Entonces, podemos hacer algo comorecorrido iterativo de preorden con las siguientes diferencias:
a) En lugar de imprimir un elemento, lo empujamos a una pila.
b) Empujamos el subárbol izquierdo antes que el subárbol derecho.
A continuación se muestra el algoritmo completo. Después del paso 2, obtenemos el reverso de un recorrido posterior al pedido en la segunda pila. Usamos la primera pila para obtener el orden correcto.
1. Push root to first stack.
2. Loop while first stack is not empty
   2.1 Pop a node from first stack and push it to second stack
   2.2 Push left and right children of the popped node to first stack
3. Print contents of second stack
Consideremos el siguiente árbol
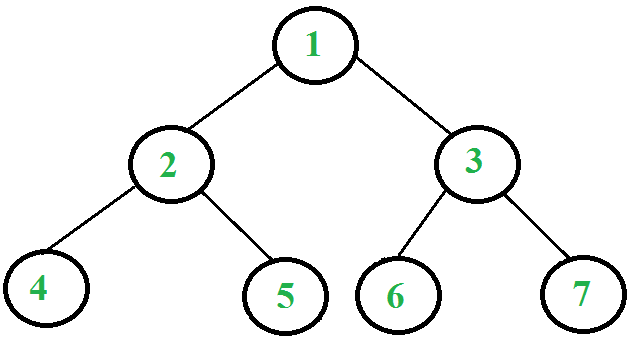
Los siguientes son los pasos para imprimir el recorrido posterior al pedido del árbol anterior usando dos pilas.
1. Push 1 to first stack.
      First stack: 1
      Second stack: Empty

2. Pop 1 from first stack and push it to second stack.
   Push left and right children of 1 to first stack
      First stack: 2, 3
      Second stack: 1

3. Pop 3 from first stack and push it to second stack.
   Push left and right children of 3 to first stack
      First stack: 2, 6, 7
      Second stack: 1, 3

4. Pop 7 from first stack and push it to second stack.
      First stack: 2, 6
      Second stack: 1, 3, 7

5. Pop 6 from first stack and push it to second stack.
      First stack: 2
      Second stack: 1, 3, 7, 6

6. Pop 2 from first stack and push it to second stack.
   Push left and right children of 2 to first stack
      First stack: 4, 5
      Second stack: 1, 3, 7, 6, 2

7. Pop 5 from first stack and push it to second stack.
      First stack: 4
      Second stack: 1, 3, 7, 6, 2, 5

8. Pop 4 from first stack and push it to second stack.
      First stack: Empty
      Second stack: 1, 3, 7, 6, 2, 5, 4

The algorithm stops here since there are no more items in the first stack.
Observe that the contents of second stack are in postorder fashion. Print them.
A continuación se muestra la implementación del recorrido iterativo posterior al orden utilizando dos pilas.
C++
#include <bits/stdc++.h>
using namespace std;

// A tree node
struct Node {

    int data;
    Node *left, *right;
};

// Function to create a new node with the given data
Node* newNode(int data)
{
    Node* node = new Node;
    node->data = data;
    node->left = node->right = NULL;
    return node;
}
// An iterative function to do post order
// traversal of a given binary tree
void postOrderIterative(Node* root)
{
    if (root == NULL)
        return;

    // Create two stacks
    stack<Node *> s1, s2;

    // push root to first stack
    s1.push(root);
    Node* node;

    // Run while first stack is not empty
    while (!s1.empty()) {
        // Pop an item from s1 and push it to s2
        node = s1.top();
        s1.pop();
        s2.push(node);

        // Push left and right children
        // of removed item to s1
        if (node->left)
            s1.push(node->left);
        if (node->right)
            s1.push(node->right);
    }

    // Print all elements of second stack
    while (!s2.empty()) {
        node = s2.top();
        s2.pop();
        cout << node->data << " ";
    }
}

// Driver code
int main()
{
    // Let us construct the tree
    // shown in above figure
    Node* root = NULL;
    root = newNode(1);
    root->left = newNode(2);
    root->right = newNode(3);
    root->left->left = newNode(4);
    root->left->right = newNode(5);
    root->right->left = newNode(6);
    root->right->right = newNode(7);

    postOrderIterative(root);

    return 0;
}
C
#include <stdio.h>
#include <stdlib.h>

// Maximum stack size
#define MAX_SIZE 100

// A tree node
struct Node {
    int data;
    struct Node *left, *right;
};

// Stack type
struct Stack {
    int size;
    int top;
    struct Node** array;
};

// A utility function to create a new tree node
struct Node* newNode(int data)
{
    struct Node* node = (struct Node*)malloc(sizeof(struct Node));
    node->data = data;
    node->left = node->right = NULL;
    return node;
}

// A utility function to create a stack of given size
struct Stack* createStack(int size)
{
    struct Stack* stack = (struct Stack*)malloc(sizeof(struct Stack));
    stack->size = size;
    stack->top = -1;
    stack->array = (struct Node**)malloc(stack->size * sizeof(struct Node*));
    return stack;
}

// BASIC OPERATIONS OF STACK
int isFull(struct Stack* stack)
{
    return stack->top - 1 == stack->size;
}

int isEmpty(struct Stack* stack)
{
    return stack->top == -1;
}

void push(struct Stack* stack, struct Node* node)
{
    if (isFull(stack))
        return;
    stack->array[++stack->top] = node;
}

struct Node* pop(struct Stack* stack)
{
    if (isEmpty(stack))
        return NULL;
    return stack->array[stack->top--];
}

// An iterative function to do post order traversal of a given binary tree
void postOrderIterative(struct Node* root)
{
    if (root == NULL)
        return;

    // Create two stacks
    struct Stack* s1 = createStack(MAX_SIZE);
    struct Stack* s2 = createStack(MAX_SIZE);

    // push root to first stack
    push(s1, root);
    struct Node* node;

    // Run while first stack is not empty
    while (!isEmpty(s1)) {
        // Pop an item from s1 and push it to s2
        node = pop(s1);
        push(s2, node);

        // Push left and right children of removed item to s1
        if (node->left)
            push(s1, node->left);
        if (node->right)
            push(s1, node->right);
    }

    // Print all elements of second stack
    while (!isEmpty(s2)) {
        node = pop(s2);
        printf("%d ", node->data);
    }
}

// Driver program to test above functions
int main()
{
    // Let us construct the tree shown in above figure
    struct Node* root = NULL;
    root = newNode(1);
    root->left = newNode(2);
    root->right = newNode(3);
    root->left->left = newNode(4);
    root->left->right = newNode(5);
    root->right->left = newNode(6);
    root->right->right = newNode(7);

    postOrderIterative(root);

    return 0;
}
Java
// Java program for iterative post
// order using two stacks

import java.util.*;
public class IterativePostorder {

    static class node {
        int data;
        node left, right;

        public node(int data)
        {
            this.data = data;
        }
    }

    // Two stacks as used in explanation
    static Stack<node> s1, s2;

    static void postOrderIterative(node root)
    {
        // Create two stacks
        s1 = new Stack<>();
        s2 = new Stack<>();

        if (root == null)
            return;

        // push root to first stack
        s1.push(root);

        // Run while first stack is not empty
        while (!s1.isEmpty()) {
            // Pop an item from s1 and push it to s2
            node temp = s1.pop();
            s2.push(temp);

            // Push left and right children of
            // removed item to s1
            if (temp.left != null)
                s1.push(temp.left);
            if (temp.right != null)
                s1.push(temp.right);
        }

        // Print all elements of second stack
        while (!s2.isEmpty()) {
            node temp = s2.pop();
            System.out.print(temp.data + " ");
        }
    }

    public static void main(String[] args)
    {
        // Let us construct the tree
        // shown in above figure

        node root = null;
        root = new node(1);
        root.left = new node(2);
        root.right = new node(3);
        root.left.left = new node(4);
        root.left.right = new node(5);
        root.right.left = new node(6);
        root.right.right = new node(7);

        postOrderIterative(root);
    }
}

// This code is contributed by Rishabh Mahrsee
Python3
# Python program for iterative postorder
# traversal using two stacks

# A binary tree node
class Node:

    # Constructor to create a new node
    def __init__(self, data):
        self.data = data
        self.left = None
        self.right = None

# An iterative function to do postorder
# traversal of a given binary tree
def postOrderIterative(root):

    if root is None:
        return

    # Create two stacks
    s1 = []
    s2 = []

    # Push root to first stack
    s1.append(root)

    # Run while first stack is not empty
    while s1:

        # Pop an item from s1 and
        # append it to s2
        node = s1.pop()
        s2.append(node)

        # Push left and right children of
        # removed item to s1
        if node.left:
            s1.append(node.left)
        if node.right:
            s1.append(node.right)

        # Print all elements of second stack
    while s2:
        node = s2.pop()
        print(node.data,end=" ")

# Driver program to test above function
root = Node(1)
root.left = Node(2)
root.right = Node(3)
root.left.left = Node(4)
root.left.right = Node(5)
root.right.left = Node(6)
root.right.right = Node(7)
postOrderIterative(root)
C#
// C# program for iterative post
// order using two stacks
using System;
using System.Collections;
public class IterativePostorder {

    public class node {
        public int data;
        public node left, right;

        public node(int data)
        {
            this.data = data;
        }
    }

    // Two stacks as used in explanation
    static public Stack s1, s2;

    static void postOrderIterative(node root)
    {
        // Create two stacks
        s1 = new Stack();
        s2 = new Stack();

        if (root == null)
            return;

        // Push root to first stack
        s1.Push(root);

        // Run while first stack is not empty
        while (s1.Count > 0) {
            // Pop an item from s1 and Push it to s2
            node temp = (node)s1.Pop();
            s2.Push(temp);

            // Push left and right children of
            // removed item to s1
            if (temp.left != null)
                s1.Push(temp.left);
            if (temp.right != null)
                s1.Push(temp.right);
        }

        // Print all elements of second stack
        while (s2.Count > 0) {
            node temp = (node)s2.Pop();
            Console.Write(temp.data + " ");
        }
    }

    public static void Main(String[] args)
    {
        // Let us construct the tree
        // shown in above figure

        node root = null;
        root = new node(1);
        root.left = new node(2);
        root.right = new node(3);
        root.left.left = new node(4);
        root.left.right = new node(5);
        root.right.left = new node(6);
        root.right.right = new node(7);

        postOrderIterative(root);
    }
}

// This code is contributed by Arnab Kundu
Javascript
<script>

      // JavaScript program for iterative post
      // order using two stacks
      class node {
        constructor(data) {
          this.data = data;
          this.left = null;
          this.right = null;
        }
      }

      function postOrderIterative(root) {
        // Two stacks as used in explanation
        // Create two stacks
        var s1 = [];
        var s2 = [];

        if (root == null) return;

        // Push root to first stack
        s1.push(root);

        // Run while first stack is not empty
        while (s1.length > 0) {
          // Pop an item from s1 and Push it to s2
          var temp = s1.pop();
          s2.push(temp);

          // Push left and right children of
          // removed item to s1
          if (temp.left != null) s1.push(temp.left);
          if (temp.right != null) s1.push(temp.right);
        }

        // Print all elements of second stack
        while (s2.length > 0) {
          var temp = s2.pop();
          document.write(temp.data + " ");
        }
      }

      // Let us construct the tree
      // shown in above figure

      var root = null;
      root = new node(1);
      root.left = new node(2);
      root.right = new node(3);
      root.left.left = new node(4);
      root.left.right = new node(5);
      root.right.left = new node(6);
      root.right.right = new node(7);

      postOrderIterative(root);

</script>
Producción:
4 5 2 6 7 3 1
Complejidad temporal : O(n) donde n no es ningún Node en un árbol binario
A continuación se muestra una descripción general de la publicación anterior.
El recorrido de preorden iterativo se puede implementar fácilmente usando dos pilas. La primera pila se utiliza para obtener el recorrido inverso del orden posterior. Los pasos para obtener un pedido posterior inverso son similares a los del pedido anticipado iterativo .
También le puede interesar ver un método que use solo una pila .
Este artículo ha sido compilado por Aashish Barnwal . Escriba comentarios si encuentra algo incorrecto o si desea compartir más información sobre el tema tratado anteriormente.
Publicación traducida automáticamente
Artículo escrito por GeeksforGeeks-1 y traducido por Barcelona Geeks. The original can be accessed here. Licence: CCBY-SA