Thymeleaf es una biblioteca de Java, un motor de plantillas utilizado para analizar y representar los datos producidos por la aplicación en archivos de plantilla, lo que proporciona transformación. Es como HTML pero se proporciona con más atributos para trabajar con datos renderizados. Permite el almacenamiento en caché de los datos/archivos analizados para aumentar la eficiencia durante la producción. Los tipos de plantillas que puede procesar son: HTML, JAVASCRIPT, CSS, XML, TEXT, RAW.
Motores de plantilla utilizados con Spring-Boot:
- hoja de tomillo
- Marcador libre
- Bigote
- maravilloso
- Páginas del servidor Java
¿Cómo funciona Thymeleaf con Spring-Boot?
- Thymeleaf sigue una arquitectura desacoplada: no conoce ningún marco web.
- De la misma manera, desconoce la abstracción del modelo de Spring y, por lo tanto, no puede manejar los datos que el controlador coloca en Model.
- Cuando la configuración automática de Spring-Boot detecta Thymeleaf en el classpath, crea beans compatibles con la vista Thymeleaf para Spring MVC.
- Puede funcionar con atributos de solicitud de Servlet.
- Por lo tanto, Spring copia los datos del modelo en atributos de solicitud con los que puede trabajar la plantilla Thymeleaf.
Ciclo de vida simple de la plantilla Thymeleaf


Para usar Thymeleaf, agregue su dependencia en la compilación del proyecto.
Experto – pom.xml
<dependency>
 <groupID>org.springframework.boot</groupID>
 <artifactID>spring-boot-starter-thymeleaf</artifactID>
</dependency>
Gradle – construir.gradle
compile group: 'org.springframework.boot', name: 'spring-boot-starter-thymeleaf'
Coloque los archivos de plantilla en el siguiente directorio:
/src/main/resources/templates/
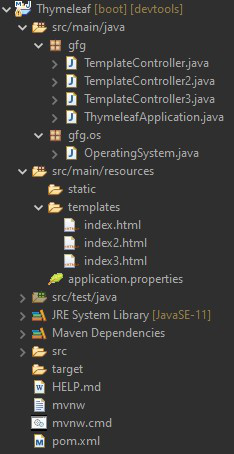
Estructura del proyecto (Maven)
1. Representación de un solo atributo de modelo
Para representar un atributo, use el atributo ‘th:text’ en la plantilla Thymeleaf
<p th:text="${attributeKey}"> attributeValue will be placed here </p>
Archivo del controlador (TemplateController.java):
Java
package gfg;

import org.springframework.stereotype.Controller;
import org.springframework.ui.Model;
import org.springframework.web.bind.annotation.GetMapping;
import org.springframework.web.bind.annotation.RequestMapping;

@Controller
@RequestMapping("/")
public class TemplateController {

    @GetMapping("/template1")
    public String template(Model model) {
        String msg = "Welcome to Thymeleaf Template";
        // adding the attribute(key-value pair)
        model.addAttribute("message", msg);
        // returning the view name
        return "index";
    }
}
Archivo de plantilla (index.html):
HTML
<!DOCTYPE html>
<html xmlns="http://www.w3.org/1999/xhtml"
      xmlns:th="http://www.thymeleaf.org">
 <head>
 <title>GFG</title>
 </head>
 <body>
 <h1>Welcome to GeeksForGeeks...</h1>
 <div id="one">
     <h1 th:text="${message}">
       <span>message will print here</span>
     </h1>
 </div>
 </body>
 </html>
Producción:

2. Renderizar una colección
Para renderizar una colección, use los atributos ‘th:each’ en la plantilla Thymeleaf
<p th:each="variable:${collectionName}">
   <span th:text=${variable}> items iterated will be placed here </span>
</p>
Nota: la etiqueta de intervalo se repetirá tanto como el número de elementos de la colección.
Archivo del controlador (TemplateController2.java):
Java
package gfg;

import java.util.ArrayList;
import java.util.List;

import org.springframework.stereotype.Controller;
import org.springframework.ui.Model;
import org.springframework.web.bind.annotation.GetMapping;
import org.springframework.web.bind.annotation.RequestMapping;

@Controller
@RequestMapping("/")
public class TemplateController2 {

    @GetMapping("/template2")
    public String template(Model model) {
        String message = "Top 5 Cloud Service Providers";
        // creating a collection
        List<String> list = new ArrayList<>();
        list.add("Amazon Web Services");
        list.add("Microsoft Azure");
        list.add("Google Cloud");
        list.add("Alibaba Cloud");
        list.add("IBM Cloud");
        model.addAttribute("message", message);
        // adding the collection attribute
        model.addAttribute("cloudProvider", list);
        return "index2";
    }
}
Archivo de plantilla (index2.html):
HTML
<!DOCTYPE html>
<html xmlns="http://www.w3.org/1999/xhtml"
 xmlns:th="http://www.thymeleaf.org">
 <head>
 <title>GFG2</title>
 </head>
 <body>
 <div id="one">
     <h2 th:text="${message}">
       <span>message will print here</span>
     </h2>
 </div >
 <div id="two" th:each="List:${cloudProvider}">
     <ul>
       <li>
        <span th:text=${List}>items will print here</span>
       </li>
     </ul>
 </div>
 </body>
 </html>
Producción:

3. Enlace de datos al objeto
Requisitos previos:
- El objeto al que se vincularán los valores debe tener métodos ‘getter/setter’ para cada campo.
- Puede usar la biblioteca ‘Lombok’ para generar estos métodos mediante la anotación ‘@Data’.
Agregar dependencia de Lombok: Maven (pom.xml)
<dependency>
 <groupId>org.projectlombok</groupId>
 <artifactId>lombok</artifactId>
 <optional>true</optional>
</dependency>
Usando Thymeleaf, los datos de entrada están vinculados al objeto usando el atributo ‘th: object’
<form
    method="POST" th:object="${objectName}">
</form>
Para asignar la entrada a un campo específico de objeto, use el atributo ‘th:field’
<input type="text" th:field="*{fieldName}" />
Archivo del controlador (TemplateController3.java):
Java
package gfg;

import org.springframework.stereotype.Controller;
import org.springframework.ui.Model;
import org.springframework.web.bind.annotation.GetMapping;
import org.springframework.web.bind.annotation.ModelAttribute;
import org.springframework.web.bind.annotation.PostMapping;
import org.springframework.web.bind.annotation.RequestMapping;

import gfg.os.OperatingSystem;

@Controller
@RequestMapping("/template3")
public class TemplateController3 {

    @GetMapping
    public String template(Model model) {
        model.addAttribute("ops", new OperatingSystem());
        return "index3";
    }

    @PostMapping
    public String template( @ModelAttribute("ops") OperatingSystem os , Model model) {
        model.addAttribute("message", os.getOS1()+" "+os.getOS2()+" "+os.getOS3());
        return "index";
    }
}
Archivo de clase del objeto que se vinculará (OperatingSystem.java):
Java
package gfg.os;

import lombok.Data;

@Data
public class OperatingSystem {

    public String OS1 ,OS2, OS3;

}
Archivo de plantilla (index3.html):
HTML
<!DOCTYPE html>
<html xmlns="http://www.w3.org/1999/xhtml"
 xmlns:th="http://www.thymeleaf.org">
 <head>
 <title>GFG3</title>
 </head>
 <body>
 <h1>Welcome to GeeksForGeeks...</h1>
 <form method="POST" th:object="${ops}">

        <div><label for="first">First OS</label></div>
        <input id="first"  type="text" th:field="*{OS1}" />

        <div><label for="second">Second OS</label></div>
        <input id="second"  type="text" th:field="*{OS2}" />

        <div><label for="third">Third OS</label></div>
        <input id="third"  type="text" th:field="*{OS3}" />

        <input type="submit" value="Send" />

 </form>
 </body>
 </html>
Producción:


Nota:
- También puede usar otros atributos de Thymeleaf.
- El almacenamiento en caché de la plantilla está habilitado de forma predeterminada.
- Puede desactivar el almacenamiento en caché especificando lo siguiente en el archivo ‘application.properties’.
spring.thymeleaf.cache=false
Publicación traducida automáticamente
Artículo escrito por pawardarshan461 y traducido por Barcelona Geeks. The original can be accessed here. Licence: CCBY-SA