Vue.js es un marco javascript progresivo para desarrollar interfaces de usuario web. Es un marco versátil que proporciona alta velocidad y rendimiento. Podemos crear aplicaciones de una sola página, así como aplicaciones de pila completa.
Las transiciones de la lista reutilizable de Vue.js permiten a los desarrolladores crear una animación y luego usarla en todos los componentes. En TransitionGroup, podemos realizar la misma transición de lista para diferentes elementos. Podemos tener una animación de deslizamiento de elementos en una lista y es posible que deseemos aplicar lo mismo en la otra lista. Esto se puede hacer fácilmente en una lista al proporcionar la animación y usar el nombre común en las listas, es posible que deseemos tener animaciones similares.
Atributo de transiciones de lista reutilizable de Vue.js:
- name : Este atributo toma el nombre de la animación que hemos definido en nuestro código de estilo. Usaremos el mismo nombre de animación en las diferentes listas.
- etiqueta : este campo solicita el tipo de elemento que es TransitionGroup, ya sea una lista ordenada (ol) o una lista desordenada (ul).
Sintaxis: podemos hacer tantas listas en las que necesitamos realizar la transición y luego nombrar la transición igual en todos los elementos.
<!-- First -->
<TransitionGroup tag="ul" name="list">
    ...
</TransitionGroup>
<!-- Second -->
<TransitionGroup tag="ul" name="list">
    ...
</TransitionGroup>
<!-- Third -->
<TransitionGroup tag="ul" name="list">
    ...
</TransitionGroup>
...
<style>

/*CSS Classes*/
.list-move{},
.list-enter-active{},
.list-leave-active {}
.list-enter-from{},
.list-leave-to {},
.list-leave-active {}
</style>
Ejemplo: En el siguiente ejemplo, tenemos dos listas, una tiene una lista de tutoriales y otra lista tiene una lista de lenguajes de programación. Luego, tenemos un botón de barajar para cada una de las listas, sobre el cual al hacer clic, se baraja la respectiva lista.
Paso 1: Primero crea un proyecto usando el siguiente comando.
npm init vue@latest
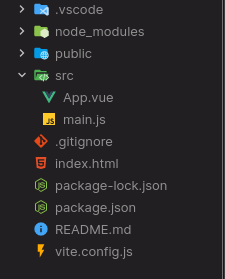
Estructura del proyecto : La estructura del proyecto es la siguiente:

Estructura del proyecto
Paso 2: en primer lugar, instale el paquete para barajar la lista usando npm de la siguiente manera:
npm i shuffle-array
Paso 3: Ahora el script tiene los datos para los tutoriales y la lista y contiene la función para barajar la lista.
App.vue
<script>
import shuffle from "shuffle-array";
export default {
  data() {
    return {
      tutorials: [
        "Data Structures",
        "Competitive Programming",
        "Interview preparation",
      ],
      languages: ["Java",
                    "C++",
                    "Python 3",
                    "Javascript"],
    };
  },
  methods: {
    shuffleList(listIndex) {
      if (listIndex === 1) this.tutorials = shuffle(this.tutorials);
      else this.languages = shuffle(this.languages);
    },
  },
};
</script>
Paso 4: A continuación, en la sección de plantillas, tenemos el TransitionGroup para cada una de las listas con el botón de reproducción aleatoria.
App.vue
<template>
  <center>
    <h1 style="text-align: center;
        color: green">
        GeeksforGeeks
   </h1>
    <strong>
        Vue.js Reusable List Transitions
    </strong>
    <br />
  </center>
  <div style="margin: auto;
         width: max-content">
    <h4>Topics</h4>
    <center>
      <button
        style="
          background-color: greenyellow;
          color: black;
          font-size: x-small;
          border-radius: 0.5rem;"
        @click="shuffleList(1)">
        Shuffle
      </button>
    </center>
    <TransitionGroup tag="ul"
                     style="list-style-type: none"
                     name="list">
      <li v-for="tutorial in tutorials" :key="tutorial"
            style="height: 1.6em">
        {{ tutorial }}
      </li>
    </TransitionGroup>
    <h4>Programming Languages</h4>
    <center>
      <button
        style="
          background-color: cadetblue;
          color: black;
          font-size: x-small;
          border-radius: 0.5rem;"
        @click="shuffleList(2)">
        Shuffle
      </button>
    </center>
    <TransitionGroup tag="ul"
                     style="list-style-type: none"
                     name="list">
      <li v-for="lang in languages" :key="lang"
            style="height: 1.6em">
        {{ lang }}
      </li>
    </TransitionGroup>
  </div>
</template>
Paso 5: Finalmente, la parte de estilo del código, tenemos la transición de entrada y salida, así como la transición de movimiento.
App.vue
<style>
  .list-move,
  .list-enter-active,
  .list-leave-active {
    transition: all 1s cubic-bezier(0.075, 0.82, 0.165, 1);
  }
  .list-enter-from,
  .list-leave-to {
    opacity: 0;
    transform: translateX(-2rem);
  }
  .list-leave-active {
    position: absolute;
  }
</style>
Aquí está el código completo.
App.vue
<script>
import shuffle from "shuffle-array";
export default {
  data() {
    return {
      tutorials: [
        "Data Structures",
        "Competitive Programming",
        "Interview preparation",
      ],
      languages: ["Java",
                    "C++",
                    "Python 3",
                    "Javascript"],
    };
  },
  methods: {
    shuffleList(listIndex) {
      if (listIndex === 1) this.tutorials = shuffle(this.tutorials);
      else this.languages = shuffle(this.languages);
    },
  },
};
</script>

<template>
  <center>
    <h1 style="text-align: center;
        color: green">
        GeeksforGeeks
    </h1>
    <strong>
        Vue.js Reusable List Transitions
    </strong>
    <br />
  </center>
  <div style="margin: auto;
         width: max-content">
    <h4>Topics</h4>
    <center>
      <button
        style="
          background-color: greenyellow;
          color: black;
          font-size: x-small;
          border-radius: 0.5rem;"
        @click="shuffleList(1)">
        Shuffle
      </button>
    </center>
    <TransitionGroup tag="ul"
                     style="list-style-type: none"
                     name="list">
      <li v-for="tutorial in tutorials" :key="tutorial"
            style="height: 1.6em">
        {{ tutorial }}
      </li>
    </TransitionGroup>
    <h4>Programming Languages</h4>
    <center>
      <button
        style="
          background-color: cadetblue;
          color: black;
          font-size: x-small;
          border-radius: 0.5rem;"
        @click="shuffleList(2)">
        Shuffle
      </button>
    </center>
    <TransitionGroup tag="ul"
                     style="list-style-type: none"
                     name="list">
      <li v-for="lang in languages" :key="lang"
            style="height: 1.6em">
        {{ lang }}
      </li>
    </TransitionGroup>
  </div>
</template>
<style>
  .list-move,
  .list-enter-active,
  .list-leave-active {
    transition: all 1s cubic-bezier(0.075, 0.82, 0.165, 1);
  }
  .list-enter-from,
  .list-leave-to {
    opacity: 0;
    transform: translateX(-2rem);
  }
  .list-leave-active {
    position: absolute;
  }
</style>
Paso 6: Ejecute el proyecto usando el siguiente comando y vea el resultado.
npm run serve
Salida: Ejecutará el proyecto en http://localhost:3000/ y el resultado será el siguiente.

Referencia: https://vuejs.org/guide/built-ins/transition.html#reusable-transitions
Publicación traducida automáticamente
Artículo escrito por RajeevSarkar y traducido por Barcelona Geeks. The original can be accessed here. Licence: CCBY-SA