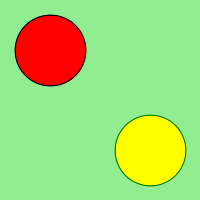
Podemos usar la pila de contexto gráfico interno de ImageMagick para administrar diferentes estilos y operaciones en Wand. Hay un total de cuatro funciones de inserción para la pila de contexto.
- empujar()
- push_clip_path()
- empujar_defs()
- empujar_patrón()
La función push() se usa para hacer crecer la pila de contexto y pop() es otra función y se usa para restaurar la pila al empuje anterior.
Sintaxis:
# for push()
wand.drawing.push()

# for pop()
wand.drawing.pop()
Parámetros: No hay parámetros para la función push() ni para la función pop()
Ejemplo 1:
Python3
from wand.image import Image
from wand.drawing import Drawing
from wand.color import Color

with Drawing() as ctx:
    ctx.fill_color = Color('RED')
    ctx.stroke_color = Color('BLACK')
    ctx.push()

    ctx.circle((50, 50), (25, 25))
    ctx.pop()

    ctx.fill_color = Color('YELLOW')
    ctx.stroke_color = Color('GREEN')
    ctx.push()

    ctx.circle((150, 150), (125, 125))
    ctx.pop()

    with Image(width = 200, height = 200, background = Color('lightgreen')) as image:
        ctx(image)
        image.save(filename = "push.png")
Producción:

Ejemplo #2:
Python3
from wand.color import Color
from wand.image import Image
from wand.drawing import Drawing
from wand.compat import nested
from math import cos, pi, sin

with nested(Color('lightblue'),
            Color('transparent'),
            Drawing()) as (bg, fg, draw):
    draw.stroke_width = 3
    draw.fill_color = fg

    for degree in range(0, 360, 15):
        draw.push()  # Grow stack
        draw.stroke_color = Color('hsl({0}%, 100 %, 50 %)'.format(degree * 100 / 360))
        t = degree / 180.0 * pi
        x = 35 * cos(t) + 50
        y = 35 * sin(t) + 50
        draw.line((50, 50), (x, y))
        draw.pop()  # Restore stack

    with Image(width = 100, height = 100, background = Color('green')) as img:
        draw(img)
        img.save(filename = "pushpop.png")
Producción:

Publicación traducida automáticamente
Artículo escrito por RahulSabharwal y traducido por Barcelona Geeks. The original can be accessed here. Licence: CCBY-SA