k-vecinos más cercanos:
k-NN es uno de los algoritmos de clasificación más básicos en el aprendizaje automático. Pertenece a la categoría de aprendizaje supervisado del aprendizaje automático. k-NN se usa a menudo en aplicaciones de búsqueda en las que busca elementos «similares». La forma en que medimos la similitud es creando una representación vectorial de los elementos y luego comparamos los vectores utilizando una métrica de distancia adecuada (como la distancia euclidiana, por ejemplo).
Generalmente se utiliza en minería de datos, reconocimiento de patrones, sistemas de recomendación y detección de intrusos.
Las bibliotecas utilizadas son:
OpenCV2
Pandas
Numpy Scikit
-aprender
Conjunto de datos utilizado:
Utilizamos haarcascade_frontalface_default.xmlun conjunto de datos que está fácilmente disponible en línea y también puede descargarlo desde este enlace .
Scikit-learn:
scikit-learn proporciona una variedad de algoritmos de aprendizaje supervisados y no supervisados a través de una interfaz consistente en Python.
Esta biblioteca se basa en SciPy que debe instalarse en sus dispositivos para poder usar scikit_learn.
Reconocimiento facial:
esto incluye tres archivos de Python donde el primero se usa para detectar el rostro y almacenarlo en un formato de lista, el segundo se usa para almacenar los datos en formato de archivo ‘.csv’ y el tercero se usa para reconocer el cara.
facedetect.py –
# this file is used to detect face
# and then store the data of the face
import cv2
import numpy as np

# import the file where data is
# stored in a csv file format
import npwriter

name = input("Enter your name: ")

# this is used to access the web-cam
# in order to capture frames
cap = cv2.VideoCapture(0)

classifier = cv2.CascadeClassifier("../dataset/haarcascade_frontalface_default.xml")

# this is class used to detect the faces as provided
# with a haarcascade_frontalface_default.xml file as data
f_list = []

while True:
    ret, frame = cap.read()

    # converting the image into gray
    # scale as it is easy for detection
    gray = cv2.cvtColor(frame, cv2.COLOR_BGR2GRAY)

    # detect multiscale, detects the face and its coordinates
    faces = classifier.detectMultiScale(gray, 1.5, 5)

    # this is used to detect the face which
    # is closest to the web-cam on the first position
    faces = sorted(faces, key = lambda x: x[2]*x[3],
                                     reverse = True)

    # only the first detected face is used
    faces = faces[:1]

    # len(faces) is the number of
    # faces showing in a frame
    if len(faces) == 1:
        # this is removing from tuple format
        face = faces[0]

        # storing the coordinates of the
        # face in different variables
        x, y, w, h = face

        # this is will show the face
        # that is being detected
        im_face = frame[y:y + h, x:x + w]

        cv2.imshow("face", im_face)


    if not ret:
        continue

    cv2.imshow("full", frame)

    key = cv2.waitKey(1)

    # this will break the execution of the program
    # on pressing 'q' and will click the frame on pressing 'c'
    if key & 0xFF == ord('q'):
        break
    elif key & 0xFF == ord('c'):
        if len(faces) == 1:
            gray_face = cv2.cvtColor(im_face, cv2.COLOR_BGR2GRAY)
            gray_face = cv2.resize(gray_face, (100, 100))
            print(len(f_list), type(gray_face), gray_face.shape)

            # this will append the face's coordinates in f_list
            f_list.append(gray_face.reshape(-1))
        else:
            print("face not found")

        # this will store the data for detected
        # face 10 times in order to increase accuracy
        if len(f_list) == 10:
            break

# declared in npwriter
npwriter.write(name, np.array(f_list))


cap.release()
cv2.destroyAllWindows()
npwriter.py – Crear/Actualizar ‘.csv’: archivo
import pandas as pd
import numpy as np
import os.path

f_name = "face_data.csv"

# storing the data into a csv file
def write(name, data):

    if os.path.isfile(f_name):

        df = pd.read_csv(f_name, index_col = 0)

        latest = pd.DataFrame(data, columns = map(str, range(10000)))
        latest["name"] = name

        df = pd.concat((df, latest), ignore_index = True, sort = False)

    else:

        # Providing range only because the data
        # here is already flattened for when
        # it was store in f_list
        df = pd.DataFrame(data, columns = map(str, range(10000)))
        df["name"] = name

    df.to_csv(f_name)
recog.py – Reconocedor de rostros
# this one is used to recognize the
# face after training the model with
# our data stored using knn
import cv2
import numpy as np
import pandas as pd

from npwriter import f_name
from sklearn.neighbors import KNeighborsClassifier


# reading the data
data = pd.read_csv(f_name).values

# data partition
X, Y = data[:, 1:-1], data[:, -1]

print(X, Y)

# Knn function calling with k = 5
model = KNeighborsClassifier(n_neighbors = 5)

# fdtraining of model
model.fit(X, Y)

cap = cv2.VideoCapture(0)

classifier = cv2.CascadeClassifier("../dataset/haarcascade_frontalface_default.xml")

f_list = []

while True:

    ret, frame = cap.read()

    gray = cv2.cvtColor(frame, cv2.COLOR_BGR2GRAY)

    faces = classifier.detectMultiScale(gray, 1.5, 5)

    X_test = []

    # Testing data
    for face in faces:
        x, y, w, h = face
        im_face = gray[y:y + h, x:x + w]
        im_face = cv2.resize(im_face, (100, 100))
        X_test.append(im_face.reshape(-1))

    if len(faces)>0:
        response = model.predict(np.array(X_test))
        # prediction of result using knn

        for i, face in enumerate(faces):
            x, y, w, h = face

            # drawing a rectangle on the detected face
            cv2.rectangle(frame, (x, y), (x + w, y + h),
                                         (255, 0, 0), 3)

            # adding detected/predicted name for the face
            cv2.putText(frame, response[i], (x-50, y-50),
                              cv2.FONT_HERSHEY_DUPLEX, 2,
                                         (0, 255, 0), 3)

    cv2.imshow("full", frame)

    key = cv2.waitKey(1)

    if key & 0xFF == ord("q") :
        break

cap.release()
cv2.destroyAllWindows()
Producción: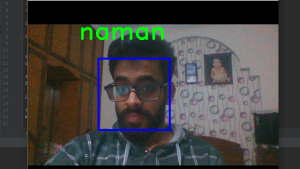
Publicación traducida automáticamente
Artículo escrito por ngrover241 y traducido por Barcelona Geeks. The original can be accessed here. Licence: CCBY-SA