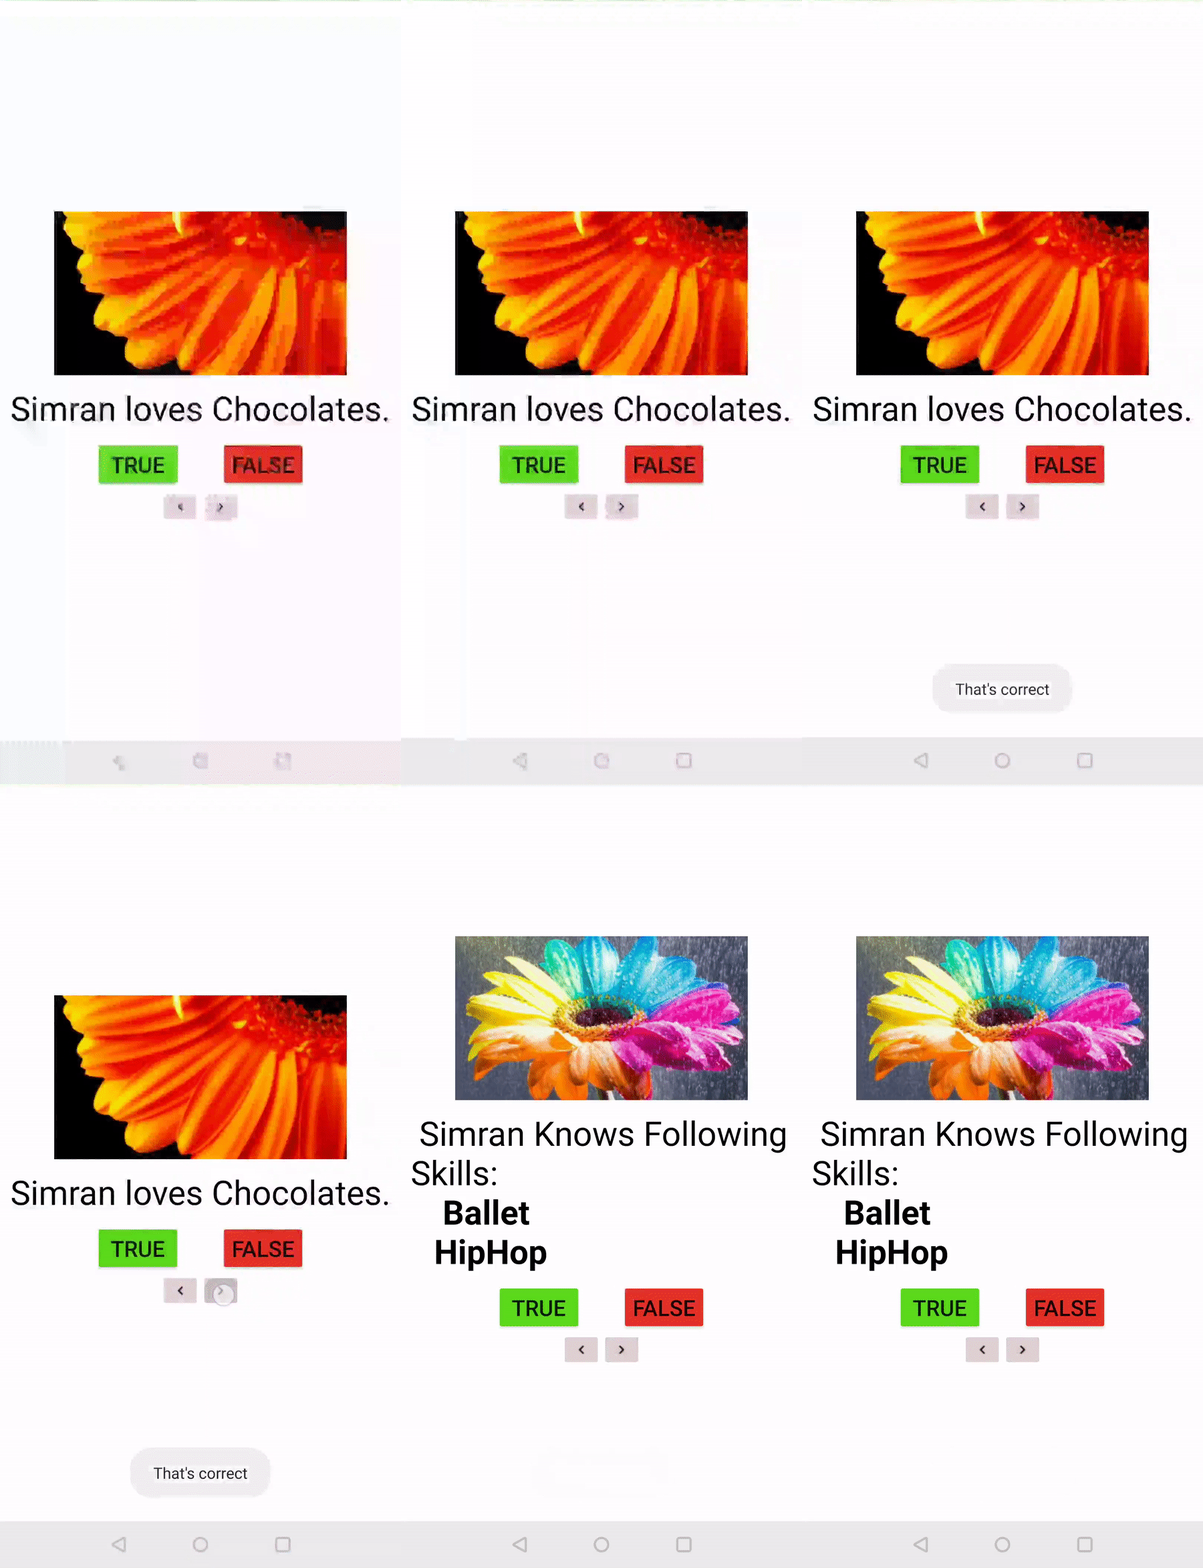
El sistema operativo Android está construido con el software de código abierto de Google utilizando Java . Una aplicación de prueba simpleque contiene un conjunto de preguntas seleccionadas y sus respuestas y verifica la exactitud de la respuesta dada por el usuario. Navega a través de las preguntas usando programación dinámica.

Acercarse
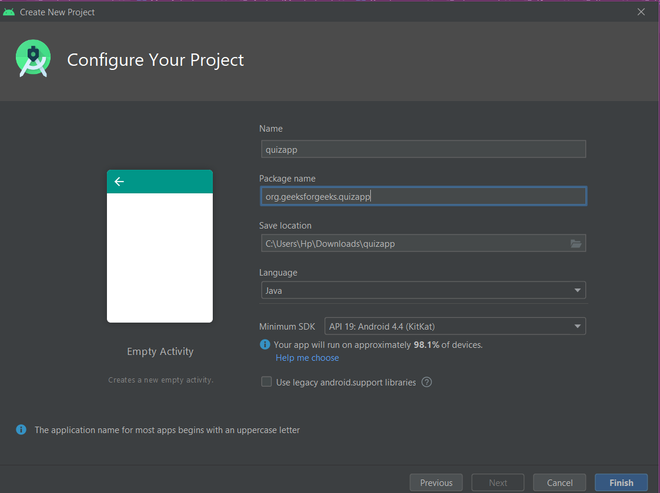
Paso 1: Creación de un nuevo proyecto
- Haga clic en la opción Archivo en la esquina superior izquierda.
- Luego haga clic en nuevo y abra un nuevo proyecto y asigne un nombre al proyecto.
- Ahora seleccione la actividad vacía con lenguaje como Java.
- Nómbrelo QuizApp .

Paso 2: diseñar la interfaz de usuario con activity_main.xml
Agregue el siguiente código en el archivo activity_main.xml . Aquí, el diseño principal es un LinearLayout cuya orientación se establece en vertical. En su interior, hay un ImageView , un TextView , dos Buttons y dos ImageButton . Button e ImageButton están dentro de un LinearLayout secundario para la orientación horizontal. ImageView se usa para mostrar la imagen y TextView se usa para mostrar la pregunta y Button se usa para indicar verdadero/falso e ImageButton para navegar a la pregunta siguiente/anterior.
Agregar imágenes en la carpeta dibujable:
Los siguientes son los enlaces proporcionados para todos los archivos dibujables que se utilizan en este proyecto.
- Para imágenes de flores (f1/f2/f3/f4/f5/f6/f7): Consulte esto.
- Para el siguiente icono : Consulte esto .
- Para el icono anterior : Consulte este .
- Para emoji : Consulte esto .
El código completo para el archivo activity_main.xml se proporciona a continuación.
activity_main.xml
<?xml version="1.0" encoding="utf-8"?>
<!--Using linear layout with vertical orientation and center gravity -->
<LinearLayout xmlns:android="http://schemas.android.com/apk/res/android"
    xmlns:app="http://schemas.android.com/apk/res-auto"
    xmlns:tools="http://schemas.android.com/tools"
    android:layout_width="match_parent"
    android:background="#FFFFFF"
    android:layout_height="match_parent"
    android:orientation="vertical"
    android:gravity="center"
    tools:context=".MainActivity">

    <!--ImageView used for showing pictures along with questions-->
    <ImageView
        android:id="@+id/myimage"
        android:layout_width="wrap_content"
        android:src="@drawable/f1"
        android:layout_height="wrap_content"/>

    <!--TextView used for showing questions on screen-->
    <TextView
        android:id="@+id/answer_text_view"
        android:text="@string/a"
        android:textColor="@android:color/black"
        android:textSize="30sp"
        android:padding="10dp"
        android:layout_width="wrap_content"
        android:layout_height="wrap_content"/>

    <!--Using another LinearLayout for showing buttons
        in horizontal orientation-->
    <LinearLayout
        android:layout_width="wrap_content"
        android:layout_height="wrap_content">

        <!--TrueButton-->
        <Button
            android:id="@+id/true_button"
            android:layout_marginRight="20dp"
            android:backgroundTint="#5BD91B"
            android:layout_width="wrap_content"
            android:layout_height="wrap_content"
            android:textSize="20sp"
            android:text="@string/true_text" />

        <!--FalseButton-->
        <Button
            android:id="@+id/false_button"
            android:layout_marginLeft="20dp"
            android:layout_width="wrap_content"
            android:backgroundTint="#E33328"
            android:layout_height="wrap_content"
            android:textSize="20sp"
            android:text="@string/false_text" />

    </LinearLayout>

    <LinearLayout
        android:layout_width="wrap_content"
        android:layout_height="wrap_content">

        <!--PreviousButton-->
        <ImageButton
            android:id="@+id/prev_button"
            android:layout_width="wrap_content"
            android:layout_height="wrap_content"
            android:src="@drawable/baseline_keyboard_arrow_left_black_18dp"
            android:backgroundTint="#DFD2D1"
            android:text="@string/prev_text" />

        <!--NextButton-->
        <ImageButton
            android:id="@+id/next_button"
            android:layout_width="wrap_content"
            android:layout_height="wrap_content"
            android:backgroundTint="#DFD2D1"
            android:src="@drawable/baseline_keyboard_arrow_right_black_18dp"
            android:text="@string/next_text" />

    </LinearLayout>
</LinearLayout>
Después de agregar este código en activity_main.xml, la interfaz de usuario se ve así:

Paso 3: Trabajar con Question.java
Para crear una nueva clase de Java, haga clic con el botón derecho en un archivo o una carpeta de Java y seleccione Nuevo > Clase de Java .

Ahora agregue el siguiente código en Question.java . Aquí use el método getters y setters para recuperar y establecer datos. El método devuelve answerTrue como ya pasó en el Constructor de preguntas.
Question.java
package org.geeksforgeeks.quizapp;

public class Question
{
    // answerResId will store question
    private int answerResId;

    // answerTrue will store correct answer
    // of the question provided
    private boolean answerTrue;

    public Question(int answerResId, boolean answerTrue)
    {
      // setting the values through
      // arguments passed in constructor
      this.answerResId = answerResId;
      this.answerTrue = answerTrue;
    }

    // returning the question passed
    public int getAnswerResId()
    {
      return answerResId;
    }

    // setting the question passed
    public void setAnswerResId(int answerResId)
    {
      this.answerResId = answerResId;
    }

    // returning the correct answer
    // of question
    public boolean isAnswerTrue()
    {
      return answerTrue;
    }

    // setting the correct
    // ans of question
    public void setAnswerTrue(boolean answerTrue)
    {
      this.answerTrue = answerTrue;
    }
}
Paso 4: trabajar con el archivo strings.xml
En el archivo strings.xml , tenemos que proporcionar el banco de preguntas. Uno puede agregar muchas preguntas dentro de este archivo.
strings.xml
<resources>
    <!--All the string resources come here including Questions and title -->
    <string name="app_name">GFG | HOW WELL DO YOU KNOW SIMRAN?</string>
    <string name="correct"><b>CORRECTNESS IS</b> \n
                           <b>%1$d</b> OUT OF 6</string>
    <string name="true_text">true</string>
    <string name="false_text">false</string>
    <string name="correct_answer">That\'s correct</string>
    <string name="wrong_answer">That\'s incorrect</string>
    <string name="a">Simran loves Chocolates.</string>
    <string name="b">Simran Knows Following Skills:\n \t
                     <b>Ballet</b>\n \t
                     <b>HipHop</b></string>
    <string name="c">Do You Think Simran Believes In:\n \t
                     <b>Luck!!!</b></string>
    <string name="d">Do You Think Simran Wants To Visit <b>Italy</b></string>
    <string name="e">Simran Loves Loyalty.</string>
    <string name="f">Simran Sleeps Less</string>
    <string name="next_text">next</string>
    <string name="prev_text">previous</string>

</resources>
Paso 5: Trabajar con MainActivity.java
El método se invoca primero cuando se inicia la aplicación. La array Question[] se instancia con el Id. de la pregunta y la respuesta correcta a la pregunta. El método se invoca cada vez que se hace clic en Button/ImageButton , por lo que cuando el usuario hace clic en un botón, verifica su Id por método y realiza acciones según nuestra lógica. actualiza la pregunta por el método de TextView y cambia las imágenes al realizar un seguimiento del número de pregunta. El método verifica la respuesta original con el botón presionado y usa Toast para mostrar el texto en consecuencia.
MainActivity.java
package org.geeksforgeeks.quizapp;

import android.annotation.SuppressLint;
import android.os.Build;
import android.os.Bundle;
import android.util.Log;
import android.view.View;
import android.widget.Button;
import android.widget.ImageButton;
import android.widget.ImageView;
import android.widget.TextView;
import android.widget.Toast;
import androidx.annotation.RequiresApi;
import androidx.appcompat.app.AppCompatActivity;

public class MainActivity extends AppCompatActivity
    implements View.OnClickListener {
    // setting up things
    private Button falseButton;
    private Button trueButton;
    private ImageButton nextButton;
    private ImageButton prevButton;
    private ImageView Image;
    private TextView questionTextView;
    private int correct = 0;
    // to keep current question track
    private int currentQuestionIndex = 0;

    private Question[] questionBank = new Question[] {
        // array of objects of class Question
        // providing questions from string
        // resource and the correct ans
        new Question(R.string.a, true),
        new Question(R.string.b, false),
        new Question(R.string.c, true),
        new Question(R.string.d, true),
        new Question(R.string.e, true),
        new Question(R.string.f, false),

    };

    @Override
    protected void onCreate(Bundle savedInstanceState)
    {
        super.onCreate(savedInstanceState);
        setContentView(R.layout.activity_main);
        // setting up the buttons
        // associated with id
        falseButton = findViewById(R.id.false_button);
        trueButton = findViewById(R.id.true_button);
        nextButton = findViewById(R.id.next_button);
        prevButton = findViewById(R.id.prev_button);
        // register our buttons to listen to
        // click events
        questionTextView
            = findViewById(R.id.answer_text_view);
        Image = findViewById(R.id.myimage);
        falseButton.setOnClickListener(this);
        trueButton.setOnClickListener(this);
        nextButton.setOnClickListener(this);
        prevButton.setOnClickListener(this);
    }

    @SuppressLint("SetTextI18n")
    @RequiresApi(api = Build.VERSION_CODES.LOLLIPOP)
    @Override
    public void onClick(View v)
    {
        // checking which button is
        // clicked by user
        // in this case user choose false
        switch (v.getId()) {
        case R.id.false_button:
            checkAnswer(false);
            break;

        case R.id.true_button:
            checkAnswer(true);
            break;

        case R.id.next_button:
            // go to next question
            // limiting question bank range
            if (currentQuestionIndex < 7) {
                currentQuestionIndex
                    = currentQuestionIndex + 1;
                // we are safe now!
                // last question reached
                // making buttons
                // invisible
                if (currentQuestionIndex == 6) {
                    questionTextView.setText(getString(
                        R.string.correct, correct));
                    nextButton.setVisibility(
                        View.INVISIBLE);
                    prevButton.setVisibility(
                        View.INVISIBLE);
                    trueButton.setVisibility(
                        View.INVISIBLE);
                    falseButton.setVisibility(
                        View.INVISIBLE);
                    if (correct > 3)

                        questionTextView.setText(
                            "CORRECTNESS IS " + correct
                            + " "
                            + "OUT OF 6");
                    // showing correctness
                    else
                        Image.setImageResource(
                            R.drawable.resu);
                    // if correctness<3 showing sad emoji
                }
                else {
                    updateQuestion();
                }
            }

            break;
        case R.id.prev_button:
            if (currentQuestionIndex > 0) {
                currentQuestionIndex
                    = (currentQuestionIndex - 1)
                      % questionBank.length;
                updateQuestion();
            }
        }
    }

    @RequiresApi(api = Build.VERSION_CODES.LOLLIPOP)
    private void updateQuestion()
    {
        Log.d("Current",
              "onClick: " + currentQuestionIndex);

        questionTextView.setText(
            questionBank[currentQuestionIndex]
                .getAnswerResId());
        // setting the textview with new question
        switch (currentQuestionIndex) {
        case 1:
            // setting up image for each
            // question
            Image.setImageResource(R.drawable.f2);
            break;
        case 2:
            Image.setImageResource(R.drawable.f3);
            break;
        case 3:
            Image.setImageResource(R.drawable.f4);
            break;
        case 4:
            Image.setImageResource(R.drawable.f5);
            break;
        case 5:
            Image.setImageResource(R.drawable.f6);
            break;
        case 6:
            Image.setImageResource(R.drawable.f7);
            break;
        case 7:
            Image.setImageResource(R.drawable.f1);
            break;
        }
    }
    private void checkAnswer(boolean userChooseCorrect)
    {
        boolean answerIsTrue
            = questionBank[currentQuestionIndex]
                  .isAnswerTrue();
        // getting correct ans of current question
        int toastMessageId;
        // if ans matches with the
        // button clicked

        if (userChooseCorrect == answerIsTrue) {
            toastMessageId = R.string.correct_answer;
            correct++;
        }
        else {
            // showing toast
            // message correct
            toastMessageId = R.string.wrong_answer;
        }

        Toast
            .makeText(MainActivity.this, toastMessageId,
                      Toast.LENGTH_SHORT)
            .show();
    }
}
Salida: ejecutar en el emulador
Proyecto completo de la aplicación QUIZ en Android –
Publicación traducida automáticamente
Artículo escrito por simrankak27 y traducido por Barcelona Geeks. The original can be accessed here. Licence: CCBY-SA