Android ImageButton es un widget de interfaz de usuario que se usa para mostrar un botón que tiene una imagen y para funcionar exactamente como el botón cuando hacemos clic en él, pero aquí agregamos una imagen en el botón Imagen en lugar de texto. Hay diferentes tipos de botones disponibles en Android como ImageButton, ToggleButton, etc.
Podemos agregar una imagen al botón simplemente usando
En Android, podemos crear el control ImageButton de dos maneras, ya sea manualmente o mediante programación.
Primero creamos un nuevo proyecto siguiendo los siguientes pasos:
- Haga clic en Archivo, luego en Nuevo => Nuevo proyecto .
- Después de eso, incluya el soporte de Kotlin y haga clic en siguiente.
- Seleccione el SDK mínimo según su conveniencia y haga clic en el botón siguiente .
- Luego seleccione la actividad vacía => siguiente => finalizar .
Diferentes atributos del widget Switch
| Atributos XML | Descripción |
|---|---|
| Android: identificación | Se utiliza para identificar de forma única el control. |
| Android: src | Se utiliza para especificar el archivo de origen de la imagen. |
| Android: al hacer clic | Usado para Especifica qué hacer cuando se hace clic en este botón. |
| Android: visibilidad | Se utiliza para establecer la visibilidad del botón de imagen. |
| android:fondo | Se utiliza para establecer el color de fondo del botón Imagen. |
| android: altura máxima | Se utiliza para establecer la altura máxima de la vista del botón Imagen. |
| android: ancho máximo | Se utiliza para establecer el ancho máximo de la vista del botón Imagen. |
| Android: relleno | Se utiliza para establecer el relleno de izquierda, derecha, arriba y abajo. |
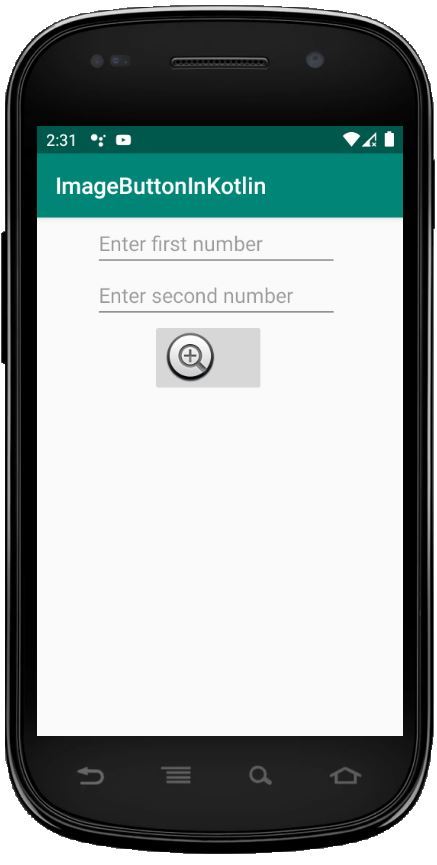
Use ImageBotton en el archivo activity_main.xml
En este archivo, incluimos Edittext e ImageButton y establecemos sus atributos como id, layout_width, sugerencia, etc.
XML
<?xml version="1.0" encoding="utf-8"?>
<LinearLayout xmlns:android="http://schemas.android.com/apk/res/android"
    android:orientation="vertical"
    android:layout_width="match_parent"
    android:layout_height="match_parent"
    android:id="@+id/linear_layout">

    <EditText
        android:id="@+id/Num1"
        android:layout_width="wrap_content"
        android:layout_height="wrap_content"
        android:layout_marginLeft="50dp"
        android:ems="10"
        android:hint= "Enter first number"/>

    <EditText
        android:id="@+id/Num2"
        android:layout_width="wrap_content"
        android:layout_height="wrap_content"
        android:layout_marginLeft="50dp"
        android:ems="10"
        android:hint= "Enter second number"/>

    <ImageButton
        android:id="@+id/imageBtn"
        android:layout_width="wrap_content"
        android:layout_height="wrap_content"
        android:layout_marginLeft="100dp"
        android:src="@android:drawable/btn_plus" />
</LinearLayout>
Modifique el archivo strings.xml para agregar el nombre de la aplicación
XML
<resources>
    <string name="app_name">ImageButtonInKotlin</string>
</resources>
Acceda a ImageButton y EditText en el archivo MainActivity.kt
En primer lugar, declaramos dos variables num1 y num2 para ambos edittext y accedemos a ellas usando los ids.
val num1 = findViewById(R.id.Num1) val num2 = findViewById (R.id.Num2)
luego, declaramos la variable imgbtn para ImageButton y configuramos OnCLickListener para verificar que el relleno esté vacío o no
val imgbtn = findViewById(R.id.imageBtn)
    imgbtn.setOnClickListener {
     if (num1.text.toString().isEmpty() || num2.text.toString().isEmpty()) {
          Toast.makeText(applicationContext,
           "Enter both numbers", Toast.LENGTH_SHORT).show()
    }
Kotlin
package com.geeksforgeeks.myfirstkotlinapp
import android.os.Bundle
import androidx.appcompat.app.AppCompatActivity
import android.widget.EditText
import android.widget.ImageButton
import android.widget.Toast
class MainActivity : AppCompatActivity() {
override fun onCreate(savedInstanceState: Bundle?) {
super.onCreate(savedInstanceState)
setContentView(R.layout.activity_main)
val num1 = findViewById<EditText>(R.id.Num1)
val num2 = findViewById<EditText>(R.id.Num2)
val imgbtn = findViewById<ImageButton>(R.id.imageBtn)
imgbtn.setOnClickListener {
if (num1.text.toString().isEmpty() || num2.text.toString().isEmpty()) {
Toast.makeText(applicationContext,
"Enter both numbers", Toast.LENGTH_SHORT).show()
}
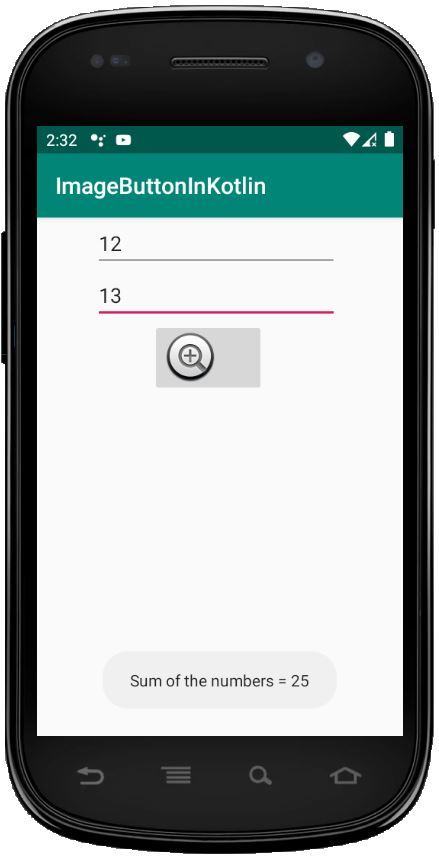
else {
val num1 = Integer.parseInt(num1.text.toString())
val num2 = Integer.parseInt(num2.text.toString())
Toast.makeText(applicationContext,
"Sum of the numbers = " + (num1 + num2),
Toast.LENGTH_SHORT).show()
}
}
}
}
Archivo AndroidManifest.xml
XML
<?xml version="1.0" encoding="utf-8"?>
<manifest xmlns:android="http://schemas.android.com/apk/res/android"
package="com.geeksforgeeks.myfirstkotlinapp">

<application
    android:allowBackup="true"
    android:icon="@mipmap/ic_launcher"
    android:label="@string/app_name"
    android:roundIcon="@mipmap/ic_launcher_round"
    android:supportsRtl="true"
    android:theme="@style/AppTheme">
    <activity android:name=".MainActivity">
        <intent-filter>
            <action android:name="android.intent.action.MAIN" />

            <category android:name="android.intent.category.LAUNCHER" />
        </intent-filter>
    </activity>
</application>

</manifest>
Ejecutar como emulador:
Publicación traducida automáticamente
Artículo escrito por Praveenruhil y traducido por Barcelona Geeks. The original can be accessed here. Licence: CCBY-SA