La tendencia de Data Science and Analytics aumenta día a día. Desde la canalización de la ciencia de datos, uno de los pasos más importantes es la implementación del modelo. Tenemos muchas opciones en python para implementar nuestro modelo. Algunos frameworks populares son Flask y Django. Pero el problema con el uso de estos marcos es que debemos tener algún conocimiento de HTML, CSS y JavaScript. Teniendo en cuenta estos requisitos previos, Adrien Treuille, Thiago Teixeira y Amanda Kelly crearon “Streamlit”. Ahora, con streamlit, puede implementar cualquier modelo de aprendizaje automático y cualquier proyecto de Python con facilidad y sin preocuparse por la interfaz. Streamlit es muy fácil de usar.
En este artículo, aprenderemos algunas funciones importantes de streamlit, crearemos un proyecto de python e implementaremos el proyecto en un servidor web local.
Instalemos streamlit. Escriba el siguiente comando en el símbolo del sistema.
pip install streamlit
Una vez que Streamlit se haya instalado correctamente, ejecute el código de Python proporcionado y, si no obtiene un error, entonces Streamlit se instaló correctamente y ahora puede trabajar con streamlit.
¿Cómo ejecutar el archivo Streamlit?
Abra el símbolo del sistema o el shell de Anaconda y escriba
streamlit run filename.py

Ejecutar archivo Streamlit
Aquí mi nombre de archivo es ‘sample.py’. Abra la URL local en el navegador web.

Comprender las funciones básicas de Streamlit
1. Título:
Python3
# import module
import streamlit as st

# Title
st.title("Hello GeeksForGeeks !!!")
Producción:

Título
2. Encabezado y Subencabezado:
Python
# Header
st.header("This is a header")

# Subheader
st.subheader("This is a subheader")
Producción:

Encabezado/Subencabezado
3. Texto:
Python3
# Text
st.text("Hello GeeksForGeeks!!!")
Producción:

Texto
4. Rebaja:
Python3
# Markdown
st.markdown("### This is a markdown")
Producción:

Reducción
5. Éxito, Información, Advertencia, Error, Excepción:
Python3
# success
st.success("Success")

# success
st.info("Information")

# success
st.warning("Warning")

# success
st.error("Error")
Producción:
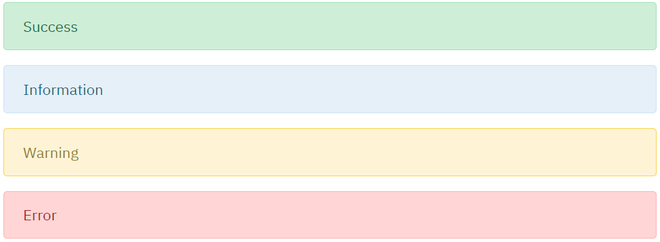
Éxito, información, advertencia y error
6. Escribe:
Usando la función de escritura, también podemos mostrar el código en formato de codificación. Esto no es posible usando st.text().
Python3
# Write text
st.write("Text with write")

# Writing python inbuilt function range()
st.write(range(10))
Producción:

función escribir()
7. Mostrar imágenes:
Python3
# Display Images

# import Image from pillow to open images
from PIL import Image
img = Image.open("streamlit.png")

# display image using streamlit
# width is used to set the width of an image
st.image(img, width=200)
Producción:

Mostrar imagen usando streamlit
8. Casilla de verificación:
Una casilla de verificación devuelve un valor booleano . Cuando la casilla está marcada, devuelve un valor verdadero ; de lo contrario, devuelve un valor falso .
Python3
# checkbox
# check if the checkbox is checked
# title of the checkbox is 'Show/Hide'
if st.checkbox("Show/Hide"):

  # display the text if the checkbox returns True value
  st.text("Showing the widget")
Producción:

La casilla de verificación no está marcada

El texto se muestra cuando la casilla está marcada
9. Botón de opción:
Python3
# radio button
# first argument is the title of the radio button
# second argument is the options for the ratio button
status = st.radio("Select Gender: ", ('Male', 'Female'))

# conditional statement to print
# Male if male is selected else print female
# show the result using the success function
if (status == 'Male'):
    st.success("Male")
else:
    st.success("Female")
Producción:

El éxito muestra Hombre cuando se selecciona la opción masculina

El éxito muestra Mujer cuando se selecciona la opción Mujer
10. Cuadro de selección:
Puede seleccionar cualquier opción del cuadro de selección.
Python3
# Selection box

# first argument takes the titleof the selectionbox
# second argument takes options
hobby = st.selectbox("Hobbies: ",
                     ['Dancing', 'Reading', 'Sports'])

# print the selected hobby
st.write("Your hobby is: ", hobby)
Producción:
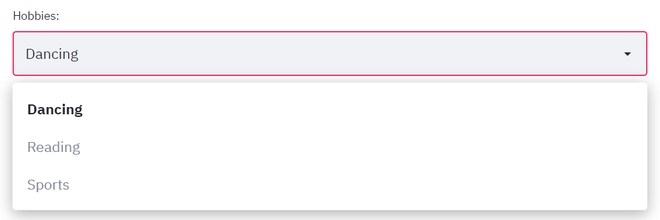
Cuadro de selección que muestra opciones para seleccionar

Se imprime la opción seleccionada
11. Cuadro de selección múltiple:
El cuadro de selección múltiple devuelve el resultado en forma de lista. Puede seleccionar varias opciones.
Python3
# multi select box

# first argument takes the box title
# second argument takes the options to show
hobbies = st.multiselect("Hobbies: ",
                         ['Dancing', 'Reading', 'Sports'])

# write the selected options
st.write("You selected", len(hobbies), 'hobbies')
Producción:

Cuadro de selección múltiple

2 opciones seleccionadas
12. Botón:
st.button() devuelve un valor booleano . Devuelve un valor True cuando se hace clic en él; de lo contrario, devuelve False .
Python3
# Create a simple button that does nothing
st.button("Click me for no reason")

# Create a button, that when clicked, shows a text
if(st.button("About")):
    st.text("Welcome To GeeksForGeeks!!!")
Producción:

Haga clic en el primer botón
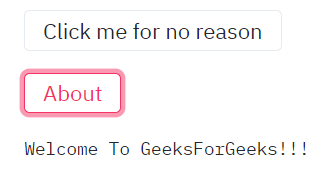
Haga clic en el botón Acerca de
13. Entrada de texto:
Python3
# Text Input

# save the input text in the variable 'name'
# first argument shows the title of the text input box
# second argument displays a default text inside the text input area
name = st.text_input("Enter Your name", "Type Here ...")

# display the name when the submit button is clicked
# .title() is used to get the input text string
if(st.button('Submit')):
    result = name.title()
    st.success(result)
Producción:

Entrada de texto

Mostrar mensaje de éxito cuando se hace clic en el botón Enviar
14. Control deslizante:
Python3
# slider

# first argument takes the title of the slider
# second argument takes the starting of the slider
# last argument takes the end number
level = st.slider("Select the level", 1, 5)

# print the level
# format() is used to print value
# of a variable at a specific position
st.text('Selected: {}'.format(level))
Producción:

Deslizador
Mini proyecto:
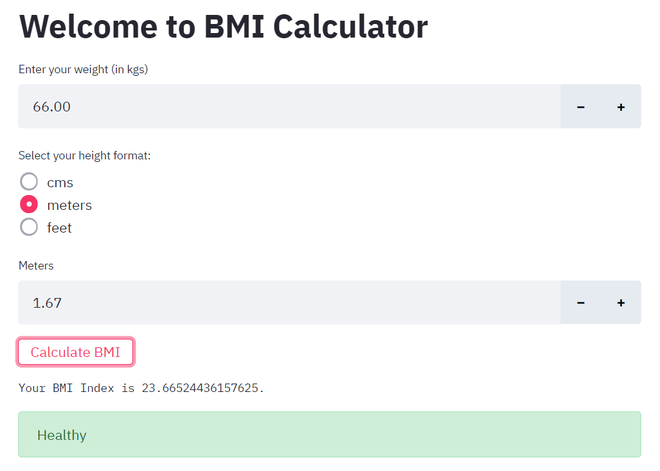
Recordemos todo lo que aprendimos anteriormente y creemos una aplicación web de Calculadora de IMC.
La fórmula del Índice de IMC cuando el peso está en Kgs y la altura en metros es:
![]()
Python3
# import the streamlit library
import streamlit as st

# give a title to our app
st.title('Welcome to BMI Calculator')

# TAKE WEIGHT INPUT in kgs
weight = st.number_input("Enter your weight (in kgs)")

# TAKE HEIGHT INPUT
# radio button to choose height format
status = st.radio('Select your height format: ',
                  ('cms', 'meters', 'feet'))

# compare status value
if(status == 'cms'):
    # take height input in centimeters
    height = st.number_input('Centimeters')

    try:
        bmi = weight / ((height/100)**2)
    except:
        st.text("Enter some value of height")

elif(status == 'meters'):
    # take height input in meters
    height = st.number_input('Meters')

    try:
        bmi = weight / (height ** 2)
    except:
        st.text("Enter some value of height")

else:
    # take height input in feet
    height = st.number_input('Feet')

    # 1 meter = 3.28
    try:
        bmi = weight / (((height/3.28))**2)
    except:
        st.text("Enter some value of height")

# check if the button is pressed or not
if(st.button('Calculate BMI')):

    # print the BMI INDEX
    st.text("Your BMI Index is {}.".format(bmi))

    # give the interpretation of BMI index
    if(bmi < 16):
        st.error("You are Extremely Underweight")
    elif(bmi >= 16 and bmi < 18.5):
        st.warning("You are Underweight")
    elif(bmi >= 18.5 and bmi < 25):
        st.success("Healthy")
    elif(bmi >= 25 and bmi < 30):
        st.warning("Overweight")
    elif(bmi >= 30):
        st.error("Extremely Overweight")
Producción:
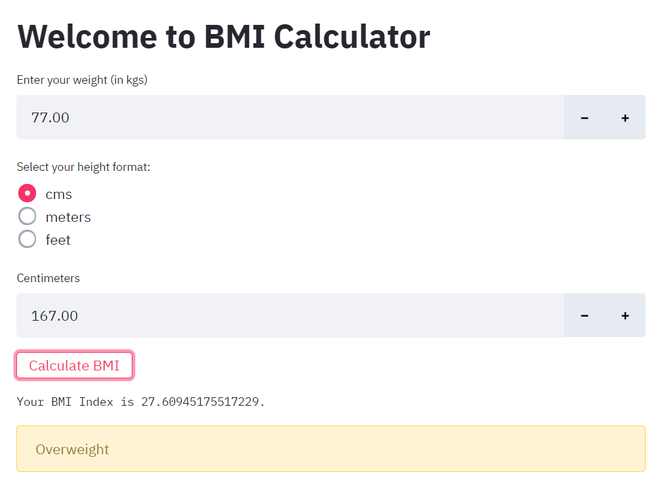
Calcular índice de IMC, escenario 1
Altura en metros:
Calcular el Índice de IMC Escenario 2
Altura en pies:
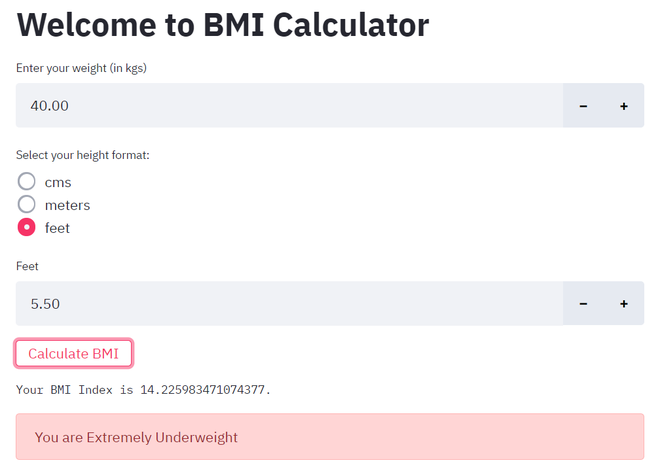
Calcular índice de IMC, escenario 3
Conclusión
De esta manera, podemos usar streamlit para implementar nuestros proyectos sin tener ningún conocimiento de HTML, CSS o JavaScript.
Nota: Streamlit aún está en desarrollo y el equipo está trayendo nuevos conceptos.
Publicación traducida automáticamente
Artículo escrito por kolheshivam17 y traducido por Barcelona Geeks. The original can be accessed here. Licence: CCBY-SA