El algoritmo de relleno de inundación consiste en reemplazar un cierto campo cerrado o de color similar con un color específico. El uso del algoritmo FloodFill se puede ver en pinturas y otros juegos como el buscaminas.
En este artículo, FloodFill se usa para un área conectada por un color específico, en Java Applet usando el algoritmo FloodFill.
Hay dos enfoques que se pueden utilizar:
- Enfoque recursivo (uso limitado ya que falla en un área más grande)
- Usando la cola (más confiable)
Ejemplos:
- Para la imagen 1:
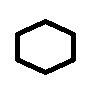
-
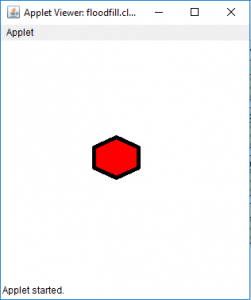
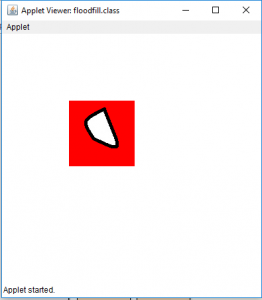
- Salida (llenada en la posición 35, 35):
- Salida (llenada en la posición 35, 35):
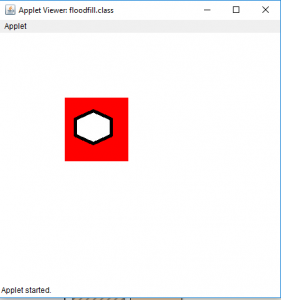
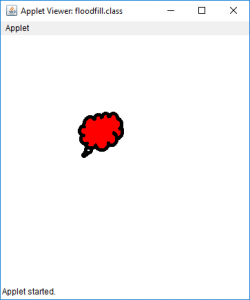
- Salida (llenada en la posición 1, 1):
- Para la imagen 2:

-
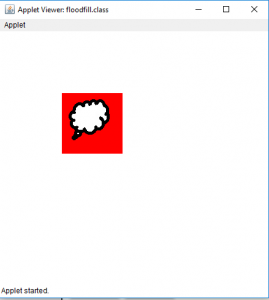
- Salida (llenada en la posición 35, 35):
- Salida (llenada en la posición 35, 35):
- Salida (llenada en la posición 1, 1):
- />
- Para la imagen 3:

-
- Salida (llenada en la posición 35, 35):
- Salida (llenada en la posición 35, 35):
- Salida (llenada en la posición 1, 1):
Programa 1: Para implementar el algoritmo de inundación en Java Applet usando recursividad:
Nota: Para ejecutar el programa, use un IDE fuera de línea como Netbeans , Eclipse, etc. Descargue las imágenes de entrada y colóquelas junto con el archivo de clase. De lo contrario, el programa podría generar el error «No se puede leer el archivo de entrada».
Java
// Java Program to implement floodfill algorithm
// in Java Applet(using recursion)
import java.awt.*;
import javax.swing.*;
import java.awt.image.*;
import java.io.*;
import javax.imageio.ImageIO;

public class floodfill extends JApplet {

    public void init()
    {
    }

    // paint function
    public void paint(Graphics g)
    {
        BufferedImage i = null;
        try {
            // Input the image to be used for FloodFill
            // The output is shown for 3 images
            // image1, image2 and image2
            i = ImageIO.read(new File("image1.jpg"));

            // floodfill with color red at point 35, 35
            // get color of image at 35, 35
            Color c = new Color(i.getRGB(35, 35));
            flood(i, g, 35, 35, c, Color.red);

            // draw the image after floodfill
            g.drawImage(i, 100, 100, this);
        }
        catch (Exception e) {
            JOptionPane.showMessageDialog(this, e.getMessage());
        }

        // draw the image after floodfill
        g.drawImage(i, 100, 100, this);
    }

    // function to floodfill the image
    public void flood(BufferedImage i,
                      Graphics g,
                      int x,
                      int y,
                      Color c,
                      Color c1)
    {
        if (x >= 1 && y >= 1
            && x < i.getWidth()
            && y < i.getHeight()) {
            // find the color at point x, y
            Color c2 = new Color(i.getRGB(x, y));

            // if there is no boundary (the color is almost
            // same as the color of the point where
            // floodfill is to be applied
            if (Math.abs(c2.getGreen() - c.getGreen()) < 30
                && Math.abs(c2.getRed() - c.getRed()) < 30
                && Math.abs(c2.getBlue() - c.getBlue()) < 30) {
                // change the color of the pixel of image
                i.setRGB(x, y, c1.getRGB());

                g.drawImage(i, 100, 100, this);

                // floodfill in all possible directions
                flood(i, g, x, y + 1, c, c1);
                flood(i, g, x + 1, y, c, c1);
                flood(i, g, x - 1, y, c, c1);
                flood(i, g, x, y - 1, c, c1);
            }
        }
    }
}
Producción:
- para la imagen 1:
Entrada:
- Producción :
- para la imagen 2:
Entrada:
- Producción :
- para la imagen 3:
Entrada:
- Producción :
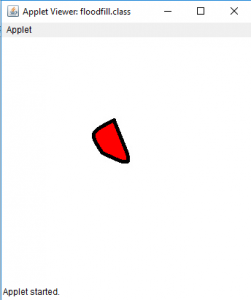
- Nota: si se inunda un área más grande (en la coordenada 1, 1) usando el enfoque recursivo, entonces el algoritmo recursivo podría bloquearse.
Ejemplo:
floodfill the larger side of image
Input:
Output:
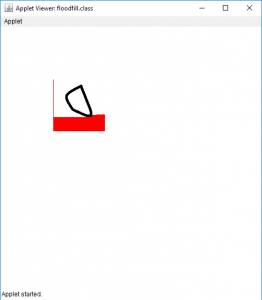
Explanation:
Since the area to be covered is very large,
therefore only some part is covered by the algorithm,
and after that the program gets crashed.
- Programa 2: Para implementar el algoritmo de inundación en Java Applet usando la cola:
Nota: Para ejecutar el programa, use un IDE fuera de línea como Netbeans, Eclipse, etc. Descargue las imágenes de entrada y colóquelas junto con el archivo de clase. De lo contrario, el programa podría generar el error «No se puede leer el archivo de entrada».
Java
// Java Program to implement floodfill algorithm
// in Java Applet(using queue)
import java.awt.*;
import javax.swing.*;
import java.awt.image.*;
import java.io.*;
import javax.imageio.ImageIO;

public class floodfill extends JApplet {

    public void init()
    {
    }

    // paint function
    public void paint(Graphics g)
    {
        BufferedImage i = null;
        try {
            // Input the image to be used for FloodFill
            // The output is shown for 3 images
            // image1, image2 and image2
            i = ImageIO.read(new File("image1.jpg"));

            // floodfill with color red at point 1, 1
            // get color of image at 1, 1
            // if 35, 35 point is floodfilled it will floodfill
            // the smaller area
            Color c = new Color(i.getRGB(1, 1));
            flood(i, g, 1, 1, c, Color.red);

            // draw the image after floodfill
            g.drawImage(i, 100, 100, this);
        }
        catch (Exception e) {
            JOptionPane.showMessageDialog(this, e.getMessage());
        }

        // draw the image after floodfill
        g.drawImage(i, 100, 100, this);
    }

    // function to floodfill the image using queue
    public void flood(BufferedImage i,
                      Graphics g,
                      int x1,
                      int y1,
                      Color c,
                      Color c1)
    {
        // create a stack using array
        int stx[] = new int[100000];
        int sty[] = new int[100000], f, r, x, y;

        // create a front and rear
        f = r = 0;

        // initialize them
        stx[0] = x1;
        sty[0] = y1;

        // while front is greater than rear
        while (f >= r) {
            // pop element out
            x = stx[r];
            y = sty[r++];
            if (x >= 1 && y >= 1
                && x < i.getWidth()
                && y < i.getHeight()) {
                // find the color at point x, y
                Color c2 = new Color(i.getRGB(x, y));

                // if there is no boundary (the color is almost
                // same as the color of the point where
                // floodfill is to be applied

                if (Math.abs(c2.getGreen() - c.getGreen()) < 30
                    && Math.abs(c2.getRed() - c.getRed()) < 30
                    && Math.abs(c2.getBlue() - c.getBlue()) < 30) {

                    // change the color of the pixel of image
                    i.setRGB(x, y, c1.getRGB());

                    g.drawImage(i, 100, 100, this);

                    // floodfill in all possible directions
                    // store them in queue
                    stx[f] = x;
                    sty[f++] = y + 1;
                    stx[f] = x;
                    sty[f++] = y - 1;
                    stx[f] = x + 1;
                    sty[f++] = y;
                    stx[f] = x - 1;
                    sty[f++] = y;
                }
            }
        }
    }
}
- Producción:
- Para la imagen 1:
Entrada:
- Para la imagen 1:
- Salida (llenada en la posición 35, 35):
- Salida (llenada en la posición 1, 1):
- Para la imagen 2:
Entrada:
- Salida (llenada en la posición 35, 35):
- Salida (llenada en la posición 1, 1):
- Para la imagen 3:
Entrada:
- Salida (llenada en la posición 35, 35):
- Salida (llenada en la posición 1, 1):
Publicación traducida automáticamente
Artículo escrito por andrew1234 y traducido por Barcelona Geeks. The original can be accessed here. Licence: CCBY-SA