Android ChronoMeter es un control de interfaz de usuario que muestra el temporizador en la vista. Podemos iniciar fácilmente un contador hacia arriba o hacia abajo con el tiempo base usando el widget de cronómetro. De forma predeterminada, el método start() puede asumir el tiempo base e inicia el contador.
En general, podemos crear el uso del widget ChronoMeter en el diseño XML, pero también podemos hacerlo mediante programación.
Primero creamos un nuevo proyecto siguiendo los siguientes pasos:
- Haga clic en Archivo , luego en Nuevo => Nuevo proyecto .
- Después de eso, incluya el soporte de Kotlin y haga clic en siguiente.
- Seleccione el SDK mínimo según su conveniencia y haga clic en el botón Siguiente .
- Luego seleccione la actividad vacía => siguiente => finalizar .
Modificar archivo activity_main.xml
En este archivo, usamos el widget LinearLayout junto con un botón para iniciar o detener el medidor y también establecer atributos para ambos.
XML
<?xml version="1.0" encoding="utf-8"?>
<androidx.constraintlayout.widget.ConstraintLayout
    xmlns:android="http://schemas.android.com/apk/res/android"
    xmlns:app="http://schemas.android.com/apk/res-auto"
    android:layout_width="match_parent"
    android:layout_height="match_parent"
    android:orientation="vertical"
    android:id="@+id/constraint_layout">


    <LinearLayout
        android:id="@+id/l_layout"
        android:layout_width="match_parent"
        android:layout_height="wrap_content"
        android:orientation="vertical">
    </LinearLayout>


    <Button
        android:id="@+id/btn"
        android:layout_width="wrap_content"
        android:layout_height="wrap_content"
        android:layout_marginStart="163dp"
        android:layout_marginTop="20dp"
        android:layout_marginEnd="163dp"
        android:text="@string/start"
        app:layout_constraintEnd_toEndOf="@id/l_layout"
        app:layout_constraintHorizontal_bias="0.485"
        app:layout_constraintStart_toEndOf="@+id/l_layout"
        app:layout_constraintStart_toStartOf="@id/l_layout"
        app:layout_constraintTop_toBottomOf="@+id/l_layout" />

</androidx.constraintlayout.widget.ConstraintLayout>
Actualizar el archivo strings.xml
Aquí, actualizamos el nombre de la aplicación usando la etiqueta de string. También tenemos otras strings que se pueden usar en el archivo MainActivity.kt.
XML
<resources>
    <string name="app_name">ChronometerInKotlin</string>
    <string name="stop">Stop Timer</string>
    <string name="start">Start Timer</string>
    <string name="working">Started</string>
    <string name="stopped">Stopped</string>
</resources>
Crear ChronoMeter en el archivo MainActivity.kt
Primero, declaramos un medidor variable para crear el cronómetro en el archivo Kotlin.
val meter = Chronometer(this)
        // set color and size of the text
        meter.setTextColor(Color.BLUE)
        meter.setTextSize(TypedValue.COMPLEX_UNIT_IN,0.25f)
también, agregue el cronómetro en el diseño usando
val linearLayout = findViewById(R.id.l_layout)
        linearLayout?.addView(meter)
luego, accedemos al botón desde el archivo xml y configuramos setOnClickListener para iniciar y detener el temporizador.
val btn = findViewById<Button>(R.id.btn)
        btn?.setOnClickListener(object : View.OnClickListener {...}
Kotlin
package com.geeksforgeeks.myfirstkotlinapp

import android.graphics.Color
import androidx.appcompat.app.AppCompatActivity

import android.os.Bundle
import android.util.TypedValue
import android.widget.Button
import android.view.View
import android.view.ViewGroup
import android.widget.Chronometer
import android.widget.LinearLayout
import android.widget.Toast

class MainActivity : AppCompatActivity() {

    override fun onCreate(savedInstanceState: Bundle?) {
        super.onCreate(savedInstanceState)
        setContentView(R.layout.activity_main)

        // create the chronometer from XML file
        val meter = Chronometer(this)
        // set color and size of the text
        meter.setTextColor(Color.BLUE)
        meter.setTextSize(TypedValue.COMPLEX_UNIT_IN,0.25f)


        val layoutParams = LinearLayout.LayoutParams(
            ViewGroup.LayoutParams.MATCH_PARENT,
            ViewGroup.LayoutParams.MATCH_PARENT)
        layoutParams.setMargins(30, 40, 120, 40)
        meter.layoutParams = layoutParams


        val linearLayout = findViewById<LinearLayout>(R.id.l_layout)
        linearLayout?.addView(meter)

        //access the button using id
        val btn = findViewById<Button>(R.id.btn)
        btn?.setOnClickListener(object : View.OnClickListener {

            var isWorking = false

            override fun onClick(v: View) {
                if (!isWorking) {
                    meter.start()
                    isWorking = true
                } else {
                    meter.stop()
                    isWorking = false
                }

                btn.setText(if (isWorking) R.string.start else R.string.stop)

                Toast.makeText(this@MainActivity, getString(
                    if (isWorking)
                        R.string.working
                    else
                        R.string.stopped),
                    Toast.LENGTH_SHORT).show()
            }
        })
    }
}
Archivo AndroidManifest.xml
XML
<?xml version="1.0" encoding="utf-8"?>
<manifest xmlns:android="http://schemas.android.com/apk/res/android"
package="com.geeksforgeeks.myfirstkotlinapp">

<application
    android:allowBackup="true"
    android:icon="@mipmap/ic_launcher"
    android:label="@string/app_name"
    android:roundIcon="@mipmap/ic_launcher_round"
    android:supportsRtl="true"
    android:theme="@style/AppTheme">
    <activity android:name=".MainActivity">
        <intent-filter>
            <action android:name="android.intent.action.MAIN" />

            <category android:name="android.intent.category.LAUNCHER" />
        </intent-filter>
    </activity>
</application>

</manifest>
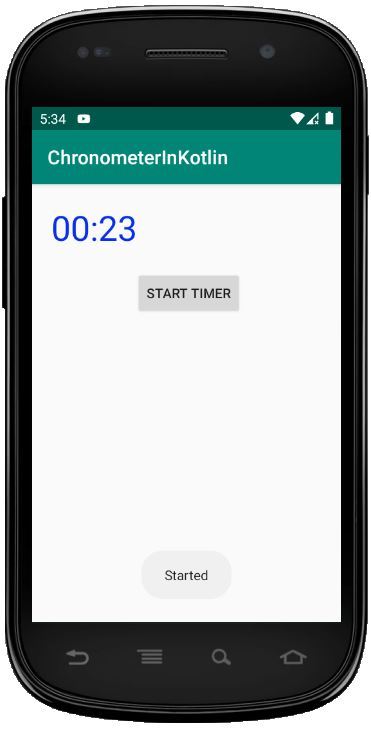
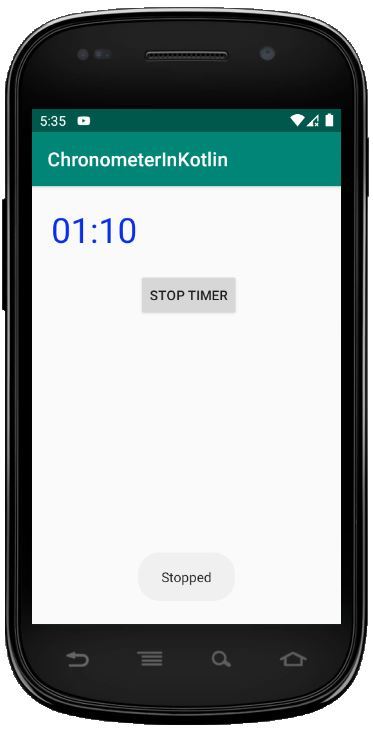
Ejecutar como emulador:
Publicación traducida automáticamente
Artículo escrito por Praveenruhil y traducido por Barcelona Geeks. The original can be accessed here. Licence: CCBY-SA