En este artículo, veremos cómo escribir texto en imágenes con el módulo Python Pillow .
Instalación
Este módulo no está precargado con Python. Entonces, para instalarlo, ejecute el siguiente comando en la línea de comandos:
pip install pillow
Implementación paso a paso:
Paso 1: importar la biblioteca de Pillows
Para completar esta tarea, las funciones requeridas de la biblioteca de Pillow son: Image, ImageDraw, ImageFont. Todas estas funciones se importan como:
desde PIL importar imagen, ImageDraw, ImageFont
Paso 2: abre una imagen
En este paso, la imagen en la que vamos a agregar texto se importa y se abre usando «Image.open(‘Image_name’)». En el caso dado, se usa el logotipo de gfg para agregar el texto. El nombre de la imagen es gfg_logo.jpeg. Entonces, se escribe como:
img = Imagen.open(‘gfg_logo.jpeg’)
Paso 3: Conversión de imágenes
En este paso, convertimos nuestra imagen a un formato editable usando «ImageDraw.Draw(‘variable utilizada para almacenar la imagen en el paso anterior’)». En el caso dado esto se escribe como:
d1 = DibujarImagen.Dibujar(img)
Paso 4: estilo de fuente.
Este paso es opcional. Es para aquellos que quieren que su texto se vea genial o con estilo porque alguien no seleccionará ningún estilo de fuente, entonces el sistema toma el estilo de fuente predeterminado. En primer lugar, descargue el archivo de estilo de fuente de https://ttfonts.net/font/1004_Mistral.htm. Después de descargar el archivo, use la función ImageFont.truetype(‘adddress_of_font_style’, font_style). En casos dados esto se escribe como:
miFuente = ImageFont.truetype(‘/home/raghav/PycharmProjects/gfg/Mistral.ttf’, 20)
Paso 5: renderiza el texto
Este es el paso principal en el que se deciden todas las propiedades de la fuente. Esto se escribe como:
d1.text((65, 10), “Texto de muestra”, relleno =(255, 0, 0),font=myFont)
- Coordenadas iniciales: la biblioteca de Pillows utiliza un sistema de coordenadas de píxeles cartesianos, con (0,0) en la esquina superior izquierda.
- Texto: String entre comillas simples o dobles
- Color de texto en formato RGB: para el color que desee, puede consultarlo en Google para conocer su código de color RGB y su uso.
- Estilo de fuente: descarga la fuente de Google y úsala.
Paso 6: Mostrar y guardar resultado.
El paso final es mostrar la imagen modificada en la pantalla para esto se usa la función img.show() y para almacenar la imagen se usa img.save(“results.jpeg”).
A continuación se muestra la implementación:

Imagen de entrada
Python3
# Import Image for basic functionalities like open, save, show
# Import ImageDraw to convert image into editable format
# Import ImageFont to choose the font style
from PIL import Image, ImageDraw, ImageFont

# gfg_logo.jpeg image opened using open
# function and assigned to variable named img
img = Image.open('gfg_logo.jpeg')

# Image is converted into editable form using
# Draw function and assigned to d1
d1 = ImageDraw.Draw(img)

# Font selection from the downloaded file
myFont = ImageFont.truetype('/home/raghav/PycharmProjects/gfg/Mistral.ttf', 20)

# Decide the text location, color and font
d1.text((65, 10), "Sample text", fill =(255, 0, 0),font=myFont)

# show and save the image
img.show()
img.save("results.jpeg")
Producción:
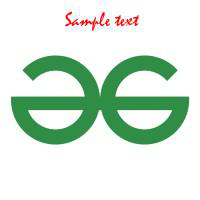
Imagen después de la modificación
Ejemplo 1: Para cambiar la ubicación del texto, cambie las coordenadas en el paso 5.
Las dimensiones se cambian de (65,100) a (65,170). Entonces, la ubicación del texto disminuye porque desde las coordenadas (x, y), el valor de la coordenada y aumenta, como se muestra en la salida.
Python3
# Import Image for basic functionalities like open, save, show
# Import ImageDraw to convert image into editable format
# Import ImageFont to choose the font style
from PIL import Image, ImageDraw, ImageFont

# gfg_logo.jpeg image opened using
# open function and assigned to variable named img
img = Image.open('gfg_logo.jpeg')

# Image is converted into editable form using
# Draw function and assigned to d1
d1 = ImageDraw.Draw(img)

# Font selection from the downloaded file
myFont = ImageFont.truetype('/home/raghav/PycharmProjects/gfg/Mistral.ttf', 20)

# Decide the text location, color and font
d1.text((65, 170), "Sample text", fill =(255, 0, 0),font=myFont)

# show and save the image
img.show()
img.save("results.jpeg")
Producción:
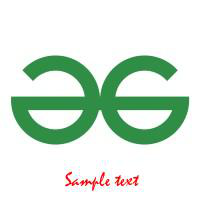
Imagen después de cambiar sus coordenadas
Ejemplo 2: Para cambiar el color del texto nuevamente cambie en el paso 5.
Hay un código de color RGB en el que funciona la Pillow (R, G, B) R para ROJO, G para VERDE, B para azul. En el caso anterior, el valor R y B es 0 y el valor G es 255, es decir, Máximo. Entonces, el color del texto cambia a verde como se muestra en la salida.
Python3
# Import Image for basic functionalities like open, save, show
# Import ImageDraw to convert image into editable format
# Import ImageFont to choose the font style
from PIL import Image, ImageDraw, ImageFont

# gfg_logo.jpeg image opened using
# open function and assigned to variable named img
img = Image.open('gfg_logo.jpeg')

# Image is converted into editable form using Draw function
# and assigned to d1
d1 = ImageDraw.Draw(img)

# Font selection from the downloaded file
myFont = ImageFont.truetype('/home/raghav/PycharmProjects/gfg/Mistral.ttf', 20)

# Decide the text location, color and font
d1.text((65, 170), "Sample text", fill =(0, 255, 0),font=myFont)

# show and save the image
img.show()
img.save("results.jpeg")
Producción:
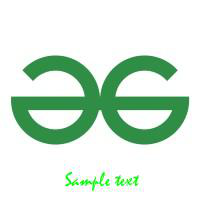
Imagen después de cambiar el color del texto
Ejemplo 3: Para cambiar el texto, cambie el campo de texto en el paso 5.
Python3
# Import Image for basic functionalities like open, save, show
# Import ImageDraw to convert image into editable format
# Import ImageFont to choose the font style
from PIL import Image, ImageDraw, ImageFont

# gfg_logo.jpeg image opened using open function
# and assigned to variable named img
img = Image.open('gfg_logo.jpeg')

# Image is converted into editable form using Draw
# function and assigned to d1
d1 = ImageDraw.Draw(img)

# Font selection from the downloaded file
myFont = ImageFont.truetype('/home/raghav/PycharmProjects/gfg/Mistral.ttf', 20)

# Decide the text location, color and font
d1.text((65, 170), "Sample text 2", fill=(0, 255, 0), font=myFont)

# show and save the image
img.show()
img.save("results.jpeg")
Producción:
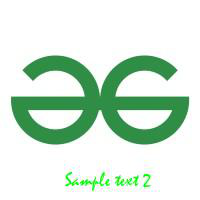
Imagen después de cambiar el campo de texto
Ejemplo 4: Para cambiar el tamaño del texto vaya al paso 4 y cambie el tamaño.
Python3
# Import Image for basic functionalities like open, save, show
# Import ImageDraw to convert image into editable format
# Import ImageFont to choose the font style
from PIL import Image, ImageDraw, ImageFont

# gfg_logo.jpeg image opened using
# open function and assigned to variable named img
img = Image.open('gfg_logo.jpeg')

# Image is converted into editable form using
# Draw function and assigned to d1
d1 = ImageDraw.Draw(img)

# Font selection from the downloaded file
myFont = ImageFont.truetype('/home/raghav/PycharmProjects/gfg/Mistral.ttf', 30)

# Decide the text location, color and font
d1.text((65, 170), "Sample text", fill = (0, 255, 0),font=myFont)

# show and save the image
img.show()
img.save("results.jpeg")
Producción:
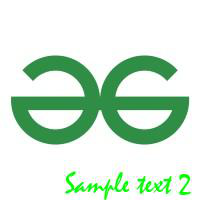
Imagen después de cambiar el tamaño del texto
Ejemplo 5: Para cambiar la fuente del texto, vaya al paso 4.
Python3
# Import Image for basic functionalities like open, save, show
# Import ImageDraw to convert image into editable format
# Import ImageFont to choose the font style
from PIL import Image, ImageDraw, ImageFont

# gfg_logo.jpeg image opened using open function and
# assigned to variable named img
img = Image.open('gfg_logo.jpeg')

# Image is converted into editable form using Draw
# function and assigned to d1
d1 = ImageDraw.Draw(img)

# Font selection from the downloaded file
myFont = ImageFont.truetype('/home/raghav/PycharmProjects/gfg/00006_44s.ttf', 30)

# Decide the text location, color and font
d1.text((0, 170), "Sample text", fill =(0, 255, 0),font=myFont)

# show and save the image
img.show()
img.save("results.jpeg")
Producción:

Imagen después de cambiar el estilo de fuente
Publicación traducida automáticamente
Artículo escrito por parasharraghav y traducido por Barcelona Geeks. The original can be accessed here. Licence: CCBY-SA