Las operaciones CRUD (Crear, Leer, Actualizar, Eliminar) son la piedra angular para los desarrolladores que ingresan a la industria del software. CRUD es en su mayoría simple y directo, excepto que los escenarios en tiempo real tienden a volverse complejos. Entre las operaciones CRUD, la operación de actualización requiere más esfuerzo para hacerlo bien en comparación con las otras tres operaciones. Una tabla de base de datos precargada es un requisito previo para llevar a cabo operaciones CRUD Leer implica solo leer datos de la base de datos y mostrarlos en la interfaz de usuario (UI). Create también es igualmente simple, ya que solo implica tomar la entrada del usuario e ingresar la entrada validada en la base de datos.
La actualización y la eliminación tienden a ser más complejas de entender, ya que implicarán el uso de estructuras de datos y otros conceptos de páginas web, como parámetros, páginas JSP, etc. Este tutorial tiene como objetivo simplificar la operación de actualización para los principiantes en CRUD. Antes de llegar al tutorial, sería beneficioso ver la representación visual de las operaciones en las páginas web y las bases de datos involucradas en las operaciones.
La imagen que se muestra a continuación muestra la base de datos que se completará en la página web:

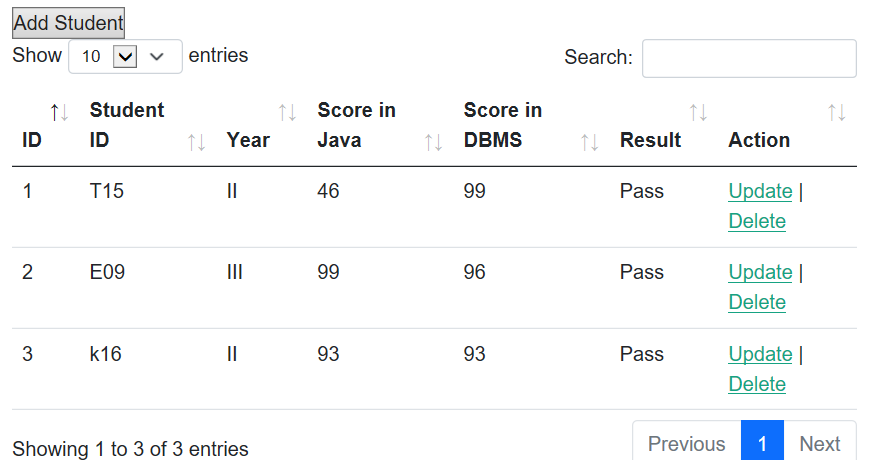
Así es como se verá la tabla poblada junto con los botones de acción de actualización y eliminación:
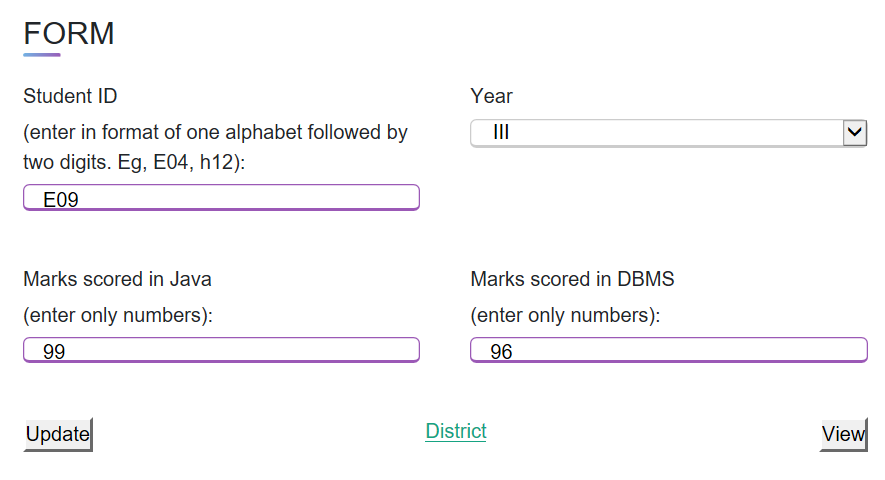
Una vez que se hace clic en el botón de actualización, así es como se completan los datos en el formulario:
Proyecto de ejemplo
Para comprender cómo funciona Update, es necesario comenzar con la operación de lectura.
Java
public List<Student> getStudents() throws Exception {
    List<Student> students = new ArrayList<>();
    // the ArrayList students contains
      // all the data from the database
    return students;
}
Ahora los estudiantes de ArrayList regresan a la página web a través de un servlet.
Nota : la operación de lectura real tiene un código más largo. El código que se muestra aquí es solo para arrojar algo de luz sobre las estructuras de datos utilizadas en la operación de creación. La declaración List<Student> usa una clase llamada Student con todas las variables, getters y setters para inicializar el objeto ArrayList.
Antes de continuar con el servlet, ayudaría un poco echar un vistazo a la estructura del objeto que se usaría en este código al usar ArrayLists.
Estudiante.java
Java
package com.jdbc;

public class Student {
    private String name;
    private String gender;
    private String course;
    private int id;

    public Student(int id, String name,String course, String gender) {
        this.name = name;
        this.gender = gender;
        this.course = course;
        this.id = id;
    }

    public String getName() {
        return name;
    }
    public void setName(String name) {
        this.name = name;
    }
    public String getGender() {
        return gender;
    }
    public void setGender(String gender) {
        this.gender = gender;
    }
    public String getCourse() {
        return course;
    }
    public void setCourse(String course) {
        this.course = course;
    }
    public int getId() {
        return id;
    }
    public void setId(int id) {
        this.id = id;
    }
    @Override
    public String toString() {
        return "Student [id=" + id + ", name" + name + ", course=" + course + ", gender=" + gender + "]";
    }
}
StudentControllerServlet.java
Java
import javax.annotation.Resource;
import javax.servlet.RequestDispatcher;
import javax.servlet.ServletException;
import javax.servlet.annotation.WebServlet;
import javax.servlet.http.HttpServlet;
import javax.servlet.http.HttpServletRequest;
import javax.servlet.http.HttpServletResponse;
import javax.sql.DataSource;

import com.jdbc.StudentDbUtil;
import com.jdbc.Student;

@WebServlet("/StudentControllerServlet")
public class StudentControllerServlet extends HttpServlet {
    private static final long serialVersionUID = 1L;
    private StudentDbUtil studentDbUtil;

private void listStudents(HttpServletRequest request, HttpServletResponse response)
        throws Exception {

        // get students from db util
        // This is where the database arraylist
          // is received in the servlet
        List<Student> students = studentDbUtil.getStudents();

        // add students to the request
        request.setAttribute("STUDENT_LIST", students);

        // send to JSP page (view)
        RequestDispatcher dispatcher =     request.getRequestDispatcher("/CRUDform.jsp");

        dispatcher.forward(request, response);
    }
}
Explicación del código:
- Los ‘estudiantes’ de ArrayList se denominan STUDENT_LIST utilizando el método request.setAttribute.
- Un despachador a la página web (CRUDform.jsp) se inicializa usando ‘RequestDispatcher dispatcher = request.getRequestDispatcher(“/CRUDform.jsp”);’ y el control si se reenvía a la misma página web usando ‘dispatcher.forward(request, response);’.
CRUDform.jsp
HTML
<%@ page language="java" contentType="text/html; charset=ISO-8859-1"
   pageEncoding="ISO-8859-1"%>
<%@ taglib uri="http://java.sun.com/jsp/jstl/core" prefix="c" %>
<%@ page import="java.util.*" %>
<!DOCTYPE html>
<html>
   <head>
      <meta http-equiv="Content-Type" content="text/html; charset=UTF-8">
      <meta name="viewport" content="width=device-width, initial-scale=1">
      <meta http-equiv="Content-Type" content="text/html; charset=ISO-8859-1">
      <title>Form</title>
   </head>
   <%
      // get students from the request object (sent by servlet)
      String crud = (String) request.getAttribute("COMMAND");
      if(crud == null){
        crud = "register";
        StudentControllerServlet s = new StudentControllerServlet();
      }
      List<Student> theStudent = (List<Student>) request.getAttribute("STUDENT_LIST");

      Student theStudents = (Student) request.getAttribute("THE_STUDENT");
      %>
   <body>
      <table id="example" class="table table-striped" style="width:100%">
         <thead>
            <tr>
               <th>Name</th>
               <th>Course</th>
               <th>Gender</th>
            </tr>
         </thead>
         <tbody>
            <c:forEach var="tempStudent" items="${STUDENT_LIST}">
            <!-- set up a link for each row -->
            <c:url var="tempLink" value="StudentControllerServlet">
               <c:param name="command" value="LOAD" />
               <c:param name="studentId" value="${tempStudent.id}" />
               <c:param name="crud" value="UPDATE" />
            </c:url>
            <!--  set up a link to delete a row -->
            <c:url var="deleteLink" value="StudentControllerServlet">
               <c:param name="command" value="DELETE" />
               <c:param name="studentId" value="${tempStudent.id}" />
            </c:url>
            <tr>
               <td> ${tempStudent.name} </td>
               <td> ${tempStudent.course} </td>
               <td> ${tempStudent.gender} </td>
               <td>
                  <a href="${tempLink}">Update</a>
                  |
                  <a href="${deleteLink}"
                     onclick="if (!(confirm('Are you sure you want to delete the entry with ID ${tempStudent.studentid} and studying in ${tempStudent.standard} year?'))) return false">Delete</a>
               </td>
            </tr>
         </tbody>
      </table>
   </body>
</html>
El ejemplo anterior requeriría el uso de etiquetas JSTL, base de datos, así que asegúrese de instalar y agregar las bibliotecas necesarias (postgresql-42.3.1.jar, javax.servlet.jsp.jstl-1.2.1.jar y javax.servlet. jsp.jstl-api-1.2.1.jar) en el proyecto.
Explicación del código:
- La ArrayList con el nombre “STUDENT_LIST” se puede recuperar usando código Java escrito entre llaves de apertura ‘<%’ y llaves de cierre ‘%>’. El comando ‘(List<Student>) request.getAttribute(“STUDENT_LIST”);’ obtiene el atributo ‘STUDENT_LIST’ del servlet, lo convierte en un objeto definido en el nombre de clase Student, y luego se almacena en la variable de tipo Object usando el comando ‘List<Student> theStudent = (List<Student>) request .getAttribute(“LISTA_ESTUDIANTES”);’.
- Ahora el ArrayList llamado «elEstudiante» es lo que se usa para llenar las tablas con las entradas de la base de datos.
- Aquí viene el uso de etiquetas JSTL. La etiqueta <c:forEach>, que se puede considerar como un equivalente JSTL del «bucle for» de Java, se usa para iterar a través de ArrayList «STUDENT_LIST» y la etiqueta debe definirse de la siguiente manera: <c:forEach var= ”tempStudent” items=”${STUDENT_LIST}”> </c:forEach>.
- Entre la apertura y el cierre de la etiqueta <c:forEach> viene el código para completar la tabla.
- La etiqueta <c:url> se usa para formatear una URL en una string y almacenarla en una variable y para realizar la reescritura de la URL cuando sea necesario. La etiqueta <c:param> tiene los atributos nombre, valor que establece el nombre y el valor de los parámetros de solicitud en la URL respectivamente. Aquí, el atributo de nombre es obligatorio sin valor predeterminado, mientras que el parámetro de valor no es obligatorio. Por ejemplo, la etiqueta ‘<c:url var=”tempLink” value=”StudentControllerServlet”><c:param name=”command” value=”LOAD” /><c:param name=”studentId” value=”${tempStudent.id}” /><c:param name=”crud” value=”UPDATE” /></c:url>’ escribe la URL de destino como http://localhost:8001/HibernateStudent/StudentControllerServlet?command= LOAD&studentId=k16&id=3&crud=UPDATE donde el comando de atributo se pasa con el valor «LOAD», que es un atributo vital.
- Cuando se presiona el botón etiquetado como «ACTUALIZAR» correspondiente al atributo CARGAR y el controlador va al StudentControllerServlet mencionado en la URL dada anteriormente.
StudentControllerServlet.java
Consulte este artículo Inyección de recursos en Java EE para comprender la primera línea del fragmento de código que se proporciona a continuación.
Java
@Resource(name="jdbc/test")
private DataSource dataSource;

@Override
public void init() throws ServletException {
    super.init();

// create our student db util ...
// and pass in the conn pool / datasource
try
{
    studentDbUtil = new StudentDbUtil(dataSource);
}
catch (Exception exc) {
    throw new ServletException(exc);
}

protected void doPost(HttpServletRequest request, HttpServletResponse response) throws ServletException, IOException {
    try {
    String theCommand = request.getParameter("command");

    switch (theCommand) {
      case "LOAD":
          loadStudent(request, response);
        break;
        }
    }
    catch (Exception exc) {
        throw new ServletException(exc);
    }
}

private void loadStudent(HttpServletRequest request, HttpServletResponse response)
            throws Exception {

    // read student id from form data
    int id = Integer.parseInt(request.getParameter("id"));
    String theStudentId = request.getParameter("studentId");
    String crud = request.getParameter("crud");

    // get student from database (db util)
    Student theStudent = studentDbUtil.getStudent(id);

    // get students from db util and control continues
    List<Student> students = studentDbUtil.getStudents();

    // add students to the request
    request.setAttribute("STUDENT_LIST", students);

    // place student in the request attribute
    request.setAttribute("THE_STUDENT", theStudent);

    request.setAttribute("COMMAND", "update");

    // send to jsp page: CRUDform.jsp
    RequestDispatcher dispatcher = request.getRequestDispatcher("/CRUDform.jsp");

    dispatcher.forward(request, response);
}
Explicación del código:
- La anotación @Resource(name=”jdbc/test”) junto con el comando “private DataSource dataSource”; se utilizará para establecer la conexión a la base de datos.
- El comando “LOAD” declarado en la página anterior se recibe en el servlet usando “String theCommand = request.getParameter(“command”);” comando y, en consecuencia, el control entra en la función de actualización según la declaración de cambio de caso.
- Después de ingresar al método loadstudent, los atributos id, theStudentId, crud se reciben mediante requests de la página anterior. Ahora los detalles correspondientes a la ID en particular se recuperan invocando el «Estudiante theStudent = studentDbUtil.getStudent(id);» pasando la ID como un parámetro que se demuestra en el código que se proporciona a continuación.
StudentDbUtil.java
Java
// point of resource injection
public DataSource dataSource;

public StudentDbUtil(DataSource theDataSource) {
    dataSource = theDataSource;
}

public Student getStudent(int theStudentId) throws Exception{
        Student theStudent = null;

        Connection myConn = null;
        PreparedStatement myStmt = null;
        ResultSet myRs = null;
        String studentId;
        try {
            // get connection to database
            myConn = dataSource.getConnection();

            //create sql to get selected student
        String sql = "select * from students where id=?";

        // create prepared statement
        myStmt = myConn.prepareStatement(sql);

        // set params
        myStmt.setInt(1, theStudentId);

        // execute statement
        myRs = myStmt.executeQuery();

        // retrieve data from result set row
        if (myRs.next()) {
            int id = myRs.getInt("id");
            String name = myRs.getString("name");
            String course = myRs.getString("course");
            String gender = myRs.getString("gender");

            // create new student object
            theStudent = new Student(id, name, course, gender);
        }
        else {
            throw new Exception("Could not find student id: " + theStudentId);
        }
        return theStudent;
        }
        finally {
            close(myConn, myStmt, myRs);
        }
    }
Explicación del código:
- La línea ‘studentDbUtil.getStudent(id);’ invoca el método correspondiente en la clase StudentDbUtil.java.
- El comando ‘myConn = dataSource.getConnection();’ obtiene una conexión a la base de datos. Después de este comando, la variable ‘myConn’ se usará para hacer referencia a la conectividad de la base de datos donde sea necesario.
- Después de eso, en el bloque de prueba, la consulta de selección ‘String sql = «select * from students where id=?»;’, la declaración preparada ‘myStmt = myConn.prepareStatement(sql);’ se declaran y se establecen los parámetros para recuperar los datos correspondientes.
- La identificación se establece en la consulta mediante ‘myStmt.setInt(1, theStudentId);’ y la consulta de selección se ejecuta con ‘myRs = myStmt.executeQuery();’ y se almacena en la variable del conjunto de resultados (myRs).
- El conjunto de resultados se itera y se invoca un objeto para almacenar los datos que se pasarán a la página web.
- La conexión se cierra en el bloque finalmente y ahora es el momento de devolver el control al servlet.
Java
private void loadStudent(HttpServletRequest request, HttpServletResponse response)
            throws Exception {

    // get students from db util and control continues
    List<Student> students = studentDbUtil.getStudents();

    // add students to the request
    request.setAttribute("STUDENT_LIST", students);

    // place student in the request attribute. This is what is used to pre-populate the form with data from the database.
    request.setAttribute("THE_STUDENT", theStudent);

    // the attribute command is set to update for identification purpose.
    request.setAttribute("COMMAND", "update");

    // send to jsp page: CRUDform.jsp
    RequestDispatcher dispatcher = request.getRequestDispatcher("/CRUDform.jsp");

    dispatcher.forward(request, response);
}
El control se dirige a la página CRUDform.jsp y los atributos se verifican dentro de las etiquetas ‘<%’ y ‘%>’ antes de las etiquetas del cuerpo para decidir si se trata de una operación de actualización, lista o registro.
HTML
<%
   // get students from the request object (sent by servlet)
   String crud = (String) request.getAttribute("COMMAND");
   if(crud == null){
       crud = "register";
       StudentControllerServlet s = new StudentControllerServlet();
   }

   List<Student> theStudent = (List<Student>) request.getAttribute("STUDENT_LIST");

   Student theStudents = (Student) request.getAttribute("THE_STUDENT");
   %>
<body>
   <div class="container">
   <div class="title">FORM</div>
   <div class="content">
   <form name="myForm" action="StudentControllerServlet" method="POST" onsubmit="return validateForm()">
      <%
         if(crud.equals("register")){%>
      <input type="hidden" name="command" value="ADD" />
      <%}else if(crud.equals("update")){%>
      <input type="hidden" name="command" value="UPDATE" />
      <input type="hidden" name="id" value="${THE_STUDENT.id}" />
      <%}
         %>
      <div class="user-details">
      <div class="input-box">
         <span class="details">Name </span>
         <input type="text" name="name" placeholder="Enter name" required value="${THE_STUDENT.name}"/> <br><br>
      </div>
      <div class="input-box">
         <span class="details">Course </span>
         <select name="course" id="course">
            <%if(crud.equals("register")){%>
            <option value="CSE">CSE</option>
            <option value="IT">IT</option>
            <option value="ECE">ECE</option>
            <br><br>
         </select>
         <%}else if(crud.equals("update")){%>
         <%if(theStudents.getCourse().equals("CSE")){%>
         <option value="CSE" selected>CSE</option>
         <%}else{%>
         <option value="CSE">CSE</option>
         <%}%>
         <%if(theStudents.getCourse().equals("IT")){%>
         <option value="IT" selected>IT</option>
         <%}else{%>
         <option value="IT">IT</option>
         <%}%>
         <%if(theStudents.getCourse().equals("ECE")){%>
         <option value="ECE" selected>ECE</option>
         <%}else{%>
         <option value="ECE">ECE</option>
         <%}%>
         <%}%>
         </select>
         <%if(crud.equals("register")){%>
         <input type="radio" id="male" name="gender" value="Male">
         <label for="male">Male </label>
         <label for="male">Female </label>
         <label for="male">Transgender </label>
         </select>
         <%}else if(crud.equals("update")){%>
         <%if(theStudents.getGender().equals("Male")){%>
         <input type="radio" id="male" name="gender" value="Male" checked>
         <label for="male">Male </label>
         <%}else{%>
         <input type="radio" id="male" name="gender" value="Male">
         <label for="male">Male </label>
         <%}%>
         <%if(theStudents.getGender().equals("Female")){%>
         <input type="radio" id="female" name="gender" value="Female" checked>
         <label for="female">Female </label>
         <%}else{%>
         <input type="radio" id="female" name="gender" value="Female">
         <label for="female">Female </label>
         <%}%>
         <%if(theStudents.getGender().equals("Transgender")){%>
         <input type="radio" id="transgender" name="gender" value="Transgender" checked>
         <label for="transgender">Transgender </label>
         <%}else{%>
         <input type="radio" id="transgender" name="gender" value="Transgender">
         <label for="transgender">Transgender </label>
         <%}%>
         <%}%>
      </div>
      <%
         if(crud.equals("update")){%>
      <button name="submit" value="SUBMIT" type="submit">Update</button>
      <%}else if(crud.equals("register")){%>
      <button name="submit" value="SUBMIT" type="submit">Register</button>
      <%}%>
   </form>
Explicación del código:
- El atributo “COMMAND” se recibe en la página JSP usando ‘String crud = (String) request.getAttribute(“COMMAND”);’ y almacenado en la variable denominada ‘crud’.
- Las ArrayLists ‘List<Student> theStudent = (List<Student>) request.getAttribute(“STUDENT_LIST”);’ y ‘Estudiante theStudents = (Estudiante) request.getAttribute(“THE_STUDENT”);’ se reciben del servlet.
- Se verifica el valor de ‘crud’ y si tiene el valor «actualizar», se inicia un tipo de entrada oculta para indicar que la operación es una operación de «actualización» cuando se envía el formulario.
- Completar automáticamente un campo de selección de texto o fecha es bastante sencillo, agregar value=”${THE_STUDENT.name}” a la etiqueta correspondiente hará el trabajo. Aquí, THE_STUDENT denota el nombre de ArrayList, name denota la ‘variable de nombre’ en ArrayList y ${} se usa ya que es código Java que se usa en HTML.
- Ahora viene el verdadero desafío para los principiantes, el atributo de valor no funciona en los botones desplegables o de opción. Aquí es donde las etiquetas JSTL vienen a salvar el día.
- Se realiza la verificación de condiciones y los componentes se seleccionan automáticamente en consecuencia. Por ejemplo, el comando <%if(theStudents.getCourse().equals(“CSE”)){%> comprueba si el valor del curso en ArrayList es igual a CSE y si se cumple la condición, entonces la opción CSE es automática. seleccionado en el menú desplegable usando <option value=”CSE” seleccionado>CSE</option>. De lo contrario, se ejecuta la cláusula else donde se ingresa la etiqueta HTML sin seleccionarla <%}else{%> <option value=”CSE”>CSE</option> <%}%>
- El if y else anterior en formato JSTL también se puede aplicar a los botones de radio para la selección automática de acuerdo con los datos en la base de datos, el único cambio es el uso de la palabra clave «marcada» en lugar de seleccionada como se muestra en el código anterior.
- El control va al código de servlet que se proporciona a continuación cuando se envía el formulario.
StudentControllerServlet.java
Java
protected void doPost(HttpServletRequest request, HttpServletResponse response) throws ServletException, IOException {
        try {
            // read the "command" parameter
            String theCommand = request.getParameter("command");

            // route to the appropriate method
            switch (theCommand) {

            case "UPDATE":
            updateStudent(request, response);
            break;

            }
        catch (Exception exc) {
            throw new ServletException(exc);
        }

    }

private void updateStudent(HttpServletRequest request, HttpServletResponse response)
            throws Exception {
            // read student info from form data
            int id = Integer.parseInt(request.getParameter("id"));
            String name = request.getParameter("name");
            String course = request.getParameter("course");
            String gender = request.getParameter("gender");
            // create a new student object
            Student theStudent = new Student(id,name,course,gender);

            // perform update on database
            studentDbUtil.updateStudent(theStudent);

            // get students from db util
            List<Student> students = studentDbUtil.getStudents();

            // add students to the request
            request.setAttribute("STUDENT_LIST", students);

            // send them back to the "list students" page
            listStudents(request, response);
    }
Como se demostró en el ejemplo de servlet anterior, el control va a la clase de base de datos en la línea ‘studentDbUtil.updateStudent(theStudent);’
StudentDbUtil.java
Java
public void updateStudent(Student theStudent) throws Exception{
        Connection myConn = null;
        PreparedStatement myStmt = null;

        try {
            // get connection to database
            myConn = dataSource.getConnection();

            // create SQL update statement
            String sql = "update student "
                    + "set  name=?,gender=?,course=? "
                    + "where id=?";

            // prepare statement
            myStmt = myConn.prepareStatement(sql);

            //set params
            myStmt.setString(1, theStudent.getName());
            myStmt.setString(2, theStudent.getGender());
            myStmt.setString(3, theStudent.getCourse());
            myStmt.setInt(4, theStudent.getId());

            myStmt.execute();
        }
        finally {
            // clean up JDBC objects
            close(myConn, myStmt, null);
        }
    }
Ahora se establece la conexión, se escribe la consulta y se ejecuta la consulta en el código dado anteriormente. La actualización es la parte comparativamente más difícil de las operaciones CRUD, especialmente al completar los botones de opción y las listas desplegables, y se ha simplificado en gran medida en este artículo. Entonces, ¡ya hemos terminado!
Nota : Se recomienda encarecidamente crear una columna SERIAL llamada ‘id’ al crear la tabla y luego usar esa columna no relacionada en la cláusula WHERE de las consultas SQL para evitar errores al ejecutar consultas.
Publicación traducida automáticamente
Artículo escrito por anishnarayan_p y traducido por Barcelona Geeks. The original can be accessed here. Licence: CCBY-SA