Procesar un video significa realizar operaciones en el video cuadro por cuadro. Los fotogramas no son más que la instancia particular del video en un solo punto de tiempo. Podemos tener múltiples fotogramas incluso en un solo segundo. Los marcos se pueden tratar como si fueran una imagen.
Por lo tanto, cualquier operación que podamos realizar en las imágenes también se puede realizar en los marcos. Veamos algunas de las operaciones con ejemplos.
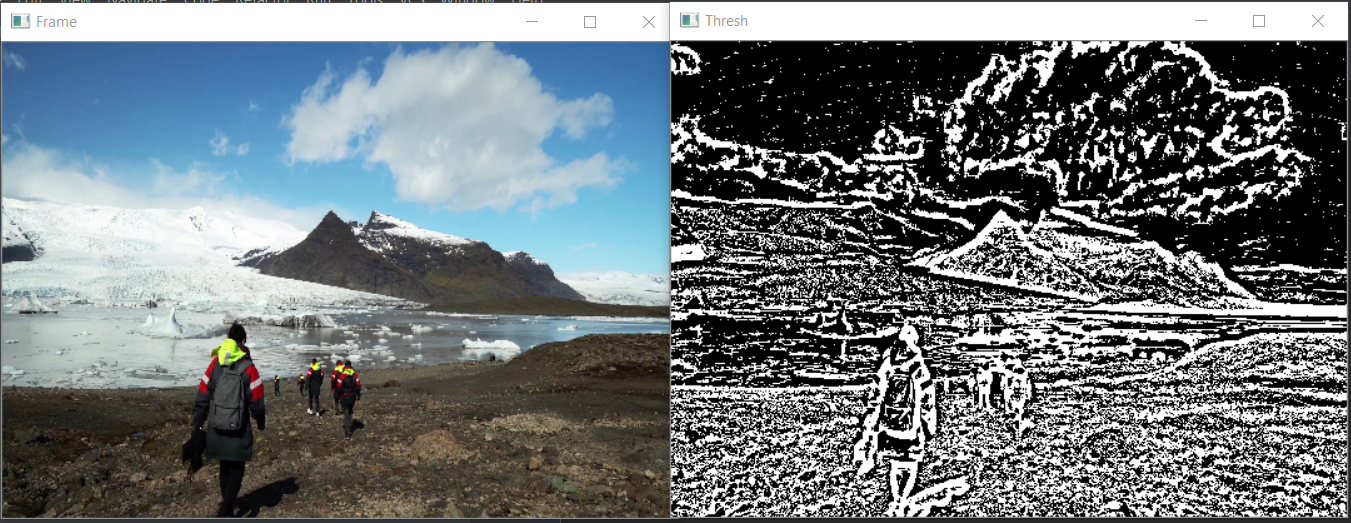
Umbral Adaptativo –
Mediante el uso de esta técnica, podemos aplicar el umbral en pequeñas regiones del marco. Entonces el valor colectivo será diferente para todo el cuadro.
Python3
# importing the necessary libraries
import cv2
import numpy as np

# Creating a VideoCapture object to read the video
cap = cv2.VideoCapture('sample.mp4')


# Loop until the end of the video
while (cap.isOpened()):

    # Capture frame-by-frame
    ret, frame = cap.read()
    frame = cv2.resize(frame, (540, 380), fx = 0, fy = 0,
                         interpolation = cv2.INTER_CUBIC)

    # Display the resulting frame
    cv2.imshow('Frame', frame)

    # conversion of BGR to grayscale is necessary to apply this operation
    gray = cv2.cvtColor(frame, cv2.COLOR_BGR2GRAY)

    # adaptive thresholding to use different threshold
    # values on different regions of the frame.
    Thresh = cv2.adaptiveThreshold(gray, 255, cv2.ADAPTIVE_THRESH_MEAN_C,
                                           cv2.THRESH_BINARY_INV, 11, 2)

    cv2.imshow('Thresh', Thresh)
    # define q as the exit button
    if cv2.waitKey(25) & 0xFF == ord('q'):
        break

# release the video capture object
cap.release()
# Closes all the windows currently opened.
cv2.destroyAllWindows()
Producción:
Suavizado –
Suavizar un video significa eliminar la nitidez del video y proporcionar un desenfoque al video. Existen varios métodos para suavizar, como cv2.Gaussianblur(), cv2.medianBlur(), cv2.bilateralFilter(). Para nuestro propósito, vamos a utilizar cv2.Gaussianblur().
Python3
# importing the necessary libraries
import cv2
import numpy as np

# Creating a VideoCapture object to read the video
cap = cv2.VideoCapture('sample.mp4')


# Loop until the end of the video
while (cap.isOpened()):
    # Capture frame-by-frame
    ret, frame = cap.read()
    frame = cv2.resize(frame, (540, 380), fx = 0, fy = 0,
                         interpolation = cv2.INTER_CUBIC)

    # Display the resulting frame
    cv2.imshow('Frame', frame)

    # using cv2.Gaussianblur() method to blur the video

    # (5, 5) is the kernel size for blurring.
    gaussianblur = cv2.GaussianBlur(frame, (5, 5), 0)
    cv2.imshow('gblur', gaussianblur)

    # define q as the exit button
    if cv2.waitKey(25) & 0xFF == ord('q'):
        break

# release the video capture object
cap.release()

# Closes all the windows currently opened.
cv2.destroyAllWindows()
Producción:

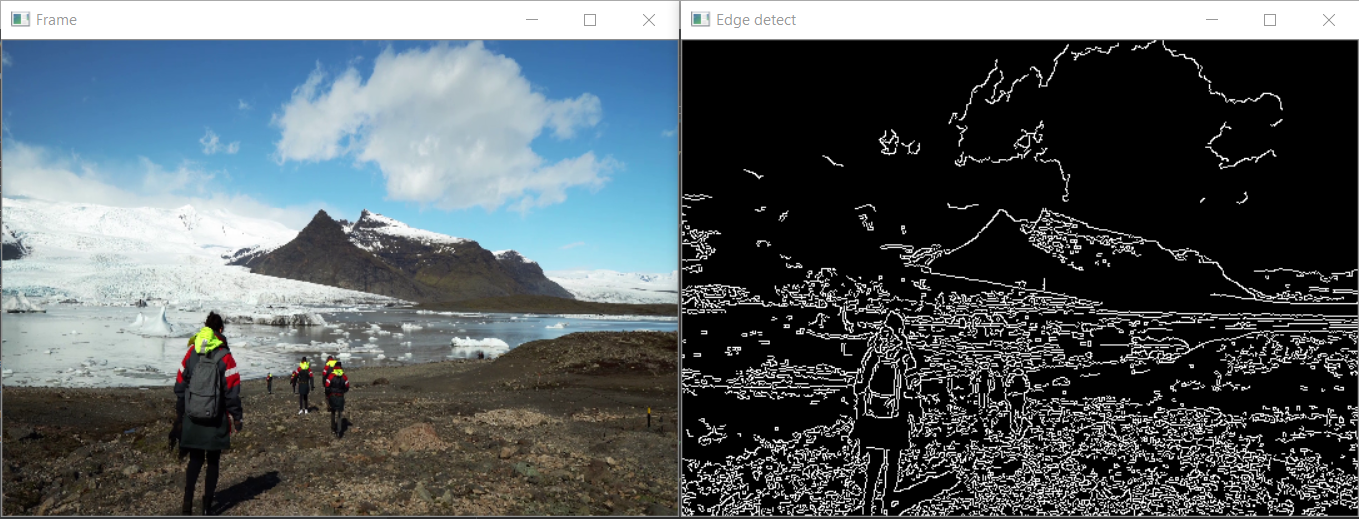
Detección de bordes –
La detección de bordes es una técnica útil para detectar los bordes de superficies y objetos en el video. La detección de bordes implica los siguientes pasos:
- Reducción de ruido
- Cálculo de gradiente
- Supresión no máxima
- Doble umbral
- Seguimiento de bordes por histéresis
Python3
# importing the necessary libraries
import cv2
import numpy as np

# Creating a VideoCapture object to read the video
cap = cv2.VideoCapture('sample.mp4')


# Loop until the end of the video
while (cap.isOpened()):
    # Capture frame-by-frame
    ret, frame = cap.read()

    frame = cv2.resize(frame, (540, 380), fx = 0, fy = 0,
                         interpolation = cv2.INTER_CUBIC)

    # Display the resulting frame
    cv2.imshow('Frame', frame)

    # using cv2.Canny() for edge detection.
    edge_detect = cv2.Canny(frame, 100, 200)
    cv2.imshow('Edge detect', edge_detect)

    # define q as the exit button
    if cv2.waitKey(25) & 0xFF == ord('q'):
        break

# release the video capture object
cap.release()
# Closes all the windows currently opened.
cv2.destroyAllWindows()
Producción:
Operaciones bit a bit –
Las operaciones bit a bit son útiles para enmascarar juntos diferentes fotogramas de un vídeo. Las operaciones bit a bit son como las que hemos estudiado en el aula, como AND, OR, NOT, XOR.
Python3
# importing the necessary libraries
import cv2
import numpy as np

# Creating a VideoCapture object to read the video
cap = cv2.VideoCapture('sample.mp4')


# Loop until the end of the video
while (cap.isOpened()):
    # Capture frame-by-frame
    ret, frame = cap.read()
    frame = cv2.resize(frame, (540, 380), fx = 0, fy = 0,
                         interpolation = cv2.INTER_CUBIC)

    # Display the resulting frame
    cv2.imshow('Frame', frame)

    # conversion of BGR to grayscale is necessary to apply this operation
    gray = cv2.cvtColor(frame, cv2.COLOR_BGR2GRAY)

    _, mask = cv2.threshold(gray, 0, 255, cv2.THRESH_BINARY_INV + cv2.THRESH_OTSU)

    # apply NOT operation on image and mask generated by thresholding
    BIT = cv2.bitwise_not(frame, frame, mask = mask)
    cv2.imshow('BIT', BIT)

    # define q as the exit button
    if cv2.waitKey(25) & 0xFF == ord('q'):
        break

# release the video capture object
cap.release()

# Closes all the windows currently opened.
cv2.destroyAllWindows()
Producción:

Podemos realizar cualquier otra operación según nuestras necesidades. Estas son solo algunas operaciones básicas que se utilizan principalmente.
Publicación traducida automáticamente
Artículo escrito por KaranGupta5 y traducido por Barcelona Geeks. The original can be accessed here. Licence: CCBY-SA