Este artículo explica un programa en python 2.7 para resolver un Sudoku 9×9 de la aplicación Android “Sudoku” de genina.com. Para resolver un sudoku de la aplicación para Android “Sudoku” de genina.com, se toma una captura de pantalla del juego (se obtiene una imagen de 720×1280), luego se obtiene el número que se encuentra en cada uno de los 81 cuadrados mediante el algoritmo KNN, una vez se determina cada elemento, el sudoku se resuelve utilizando un algoritmo de satisfacción de restricciones con retroceso.
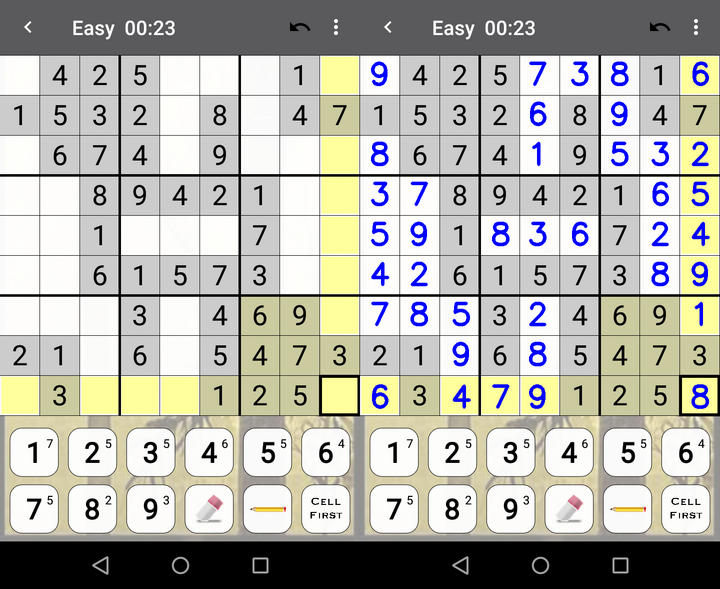
A la izquierda está nuestra entrada: Captura de pantalla que vamos a analizar. A la derecha está la solución.
¿Cómo funciona esto?
Paso 1: Preprocesamiento de imágenes
Primer paso, Preprocesamiento de imágenes: extraiga cada cuadrado de sudoku individualmente y guárdelos secuencialmente como foto # .png (donde # va de 0 a 80). Se obtienen imágenes de 80×75 píxeles.
Código:
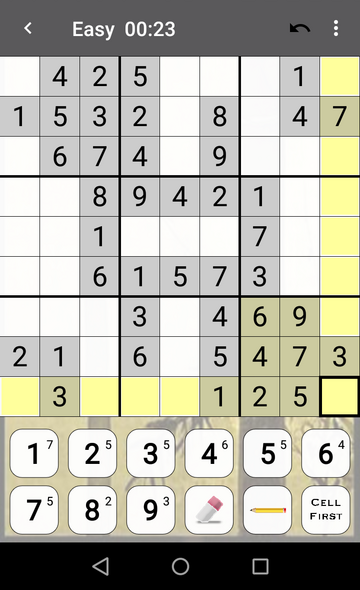
Entrada: foto0.png. Esta es la foto que vamos a analizar.
Código:
python
#/Preprocessing.py / import cv2
import numpy as np
import Functions

# Relative path
path ="./Screenshots/"

# Image to analyze
number = input("Enter image number: ")
globalPath = path+"photo"+str(number)+".png"
image = cv2.imread(globalPath)

# Save the name of the image to analyze after in Main.py
file = open("image.txt", "w")
file.write(globalPath)
file.close()

# MAIN
if __name__ == '__main__':

    # PREPROCESSING -> Crop the edges, ads and all
    # the images outside the sudoku board
    image = Functions.cropImage(image, 218)
    image = Functions.rotateImage(image, 180)
    image = Functions.cropImage(image, 348)
    image = Functions.rotateImage(image, 180)

    # Crop each box in the sudoku board
    cont = 0
    w = 0
    for j in range(9):
        h = 0

        for i in range(9):

            nombre = "image"+ str(cont) + ".png"
            image1 = Functions.cropBox(image, w, h, 75, 80)

            # Save the image
            Functions.saveImage(image1, nombre)
            h = h + 80
            cont = cont + 1

        # Position of the pixel where start the image
        w = 80*(j + 1)
Código: cree una biblioteca con funciones solo para preprocesamiento y transformación de imágenes llamada «Funciones».
python
#/Functions.py / import cv2
import numpy as np

# Function to rotate the image
def rotateImage(image, angle):
     image_center = tuple(np.array(image.shape[1::-1]) / 2)
     rot_mat = cv2.getRotationMatrix2D(image_center, angle, 1.0)
     result = cv2.warpAffine(image, rot_mat, image.shape[1::-1], flags = cv2.INTER_LINEAR)
     return result

# Function to crop top border in the image
def cropImage(image, x):

    # x determine how far to cut the image
    # fileb determines with what name we are going to save the image
    # Determine image dimensions
    height, width, channels = image.shape
    crop_img = image[x:height, 0:width]
    return crop_img

# Function to crop every box (there are 81 boxes in total)
def cropBox(image, x, y, h, w):
    # Each side of the square / box has a side of length 10
    crop_img = image[x:(x + h), y:(y + w)]
    return crop_img

# Function to save the image
def saveImage(image, fileb):
    new_path = "./Images/"
    cv2.imwrite(new_path + fileb, image)
    cv2.waitKey(0)
    cv2.destroyAllWindows()

# Function to crop all borders of each box
def cropBorder(image):

    # Determine image dimensions
    height, width, channels = image.shape
    crop_img = image[12:height-12, 12:width-12]
    return crop_img
Paso 2: Transformación de la imagen
Recorta los bordes de cada cuadro, en caso de que haya algún borde negro que se pueda inferir en nuestro análisis. Cada imagen tiene 56×51 píxeles.
Código:
python
#/Transformation.py / import cv2
import numpy as np
import Functions

# Relative path
path ="./Images/"

if __name__ == '__main__':

    for x in range(81):

        # Image to analyze
        nameImage = "image" + str(x) + ".png"
        image = cv2.imread(path + nameImage)
        image = Functions.cropBorder(image)
        Functions.saveImage(image, nameImage)
Paso 3: Clasificación KNN
Analiza qué número hay en el cuadro. En este caso, se usa el algoritmo de Canny para determinar si hay un número o es una casilla vacía. Luego, a través del algoritmo KNN, se determina qué número está en el cuadro. Para la extracción de características se utilizaron los momentos de Hu: 1 y 2, filtro Gaussiano para filtrado y umbralización no supervisada.
Código:
python
#/Preprocessing.py / import cv2
import numpy as np
import Functions

# Relative path
path ="./Screenshots/"

# Image to analyze
number = input("Enter image number: ")
globalPath = path+"photo"+str(number)+".png"
image = cv2.imread(globalPath)

# Save the name of the image to analyze after in Main.py
file = open("image.txt", "w")
file.write(globalPath)
file.close()

# MAIN
if __name__ == '__main__':

    # PREPROCESSING -> Crop the edges, ads and all
    # the images outside the sudoku board
    image = Functions.cropImage(image, 218)
    image = Functions.rotateImage(image, 180)
    image = Functions.cropImage(image, 348)
    image = Functions.rotateImage(image, 180)

    # Crop each box in the sudoku board
    cont = 0
    w = 0
    for j in range(9):
        h = 0

        for i in range(9):

            nombre = "image"+ str(cont) + ".png"
            image1 = Functions.cropBox(image, w, h, 75, 80)

            # Save the image
            Functions.saveImage(image1, nombre)
            h = h + 80
            cont = cont + 1

        # Position of the pixel where start the image
        w = 80*(j + 1)
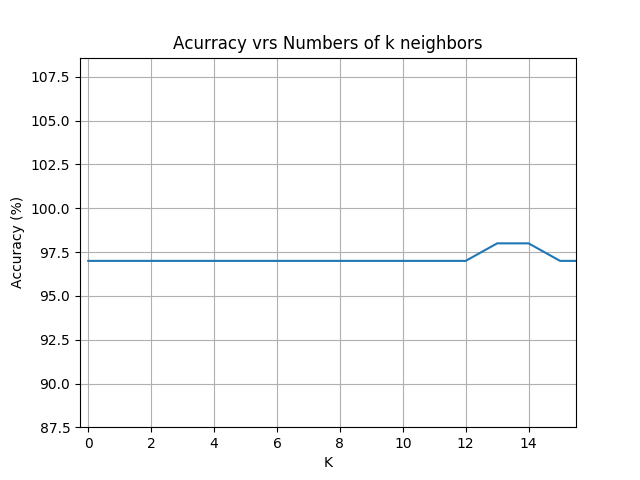
Mostrar algoritmo KNN de rendimiento
Vector.txt
contiene todos los elementos extraídos de la captura de pantalla (donde los cuadros se desplazaron de izquierda a derecha, de arriba a abajo). En este proyecto, el desempeño del algoritmo KNN presentó un 97% de precisión con respecto a todas las imágenes analizadas en el Test. En caso de algún error en el reconocimiento de los números existe la opción de cambiar manualmente una predicción de la casilla en el
vector.txt
.

Resultado del reconocimiento de todos los dígitos de la grilla sudoku de la imagen foto0.jpg
Paso 4: ¡Ahora resuelve el sudoku!
Se presenta un algoritmo de satisfacción de restricciones con retroceso para resolver el sudoku.
Código:
python
#/Solver.py / import numpy as np

# Dictionary with grid numbers
def solverGrid(grid):

    values = valuesGrid(grid)
    return searchValues(values)

# Exchange of items
def exchangeValues(A, B):

    return [a + b for a in A for b in B]

# Define initial values
def initialValues(grid):
    return dict(zip(sections, grid))

# Define values in the grid
def valuesGrid(grid):
    numbers = []

    for c in grid:
        if c == '.':
            numbers.append('123456789')
        elif c in '123456789':
            numbers.append(c)

    return dict(zip(sections, numbers))

# Delete the values that are already inside the grid
def eliminateValues(numbers):

    solved_values = [box for box in numbers.keys() if len(numbers[box]) == 1]
    for box in solved_values:
        digit = numbers[box]
        for vecino in neighbors[box]:
            numbers[vecino] = numbers[vecino].replace(digit, '')
    return numbers

def onlyOption(numbers):
    for unit in unitlist:
        for digit in '123456789':
            dplaces = [box for box in unit if digit in numbers[box]]
            if len(dplaces) == 1:
                numbers[dplaces[0]] = digit
    return numbers

def reduceSudoku(numbers):
    stalled = False
    while not stalled:
        # Check how many boxes have a determined value
        solved_values_before = len([box for box in numbers.keys() if len(numbers[box]) == 1])

        # Set the Eliminate Strategy
        numbers = eliminateValues(numbers)

        # Use the Only Choice Strategy
        numbers = onlyOption(numbers)

        # Check how many boxes have a determined value, to compare
        solved_values_after = len([box for box in numbers.keys() if len(numbers[box]) == 1])

        # If no new values were added, stop the loop.
        stalled = solved_values_before == solved_values_after

        # Sanity check, return False if there is a box with zero available values:
        if len([box for box in numbers.keys() if len(numbers[box]) == 0]):
            return False

    return numbers

def searchValues(numbers):

    numbers = reduceSudoku(numbers)

    if numbers is False:
        return False    ## Failure
    if all(len(numbers[s]) == 1 for s in sections):
        return numbers  ## Ok

    # Choose one of the unfilled boxes
    unfilled_squares = [(len(numbers[s]), s) for s in sections if len(numbers[s]) > 1]
    n, s = min(unfilled_squares)

    # Solve the next boxes
    for value in numbers[s]:
        nova_sudoku = numbers.copy()
        nova_sudoku[s] = value
        attempt = searchValues(nova_sudoku)
        if attempt:
            return attempt

# Define values
rows = 'ABCDEFGHI'
columns = '123456789'

sections = exchangeValues(rows, columns)
rowsUnit = [exchangeValues(r, columns) for r in rows]
columnUnits = [exchangeValues(rows, c) for c in columns]
boxUnits = [exchangeValues(rs, cs) for rs in ('ABC', 'DEF', 'GHI') for cs in ('123', '456', '789')]

unitlist = rowsUnit + columnUnits + boxUnits

units = dict((s, [u for u in unitlist if s in u]) for s in sections)
neighbors = dict((s, set(sum(units[s], []))-set([s])) for s in sections)

# MAIN
if __name__ == '__main__':

    # With file manager to read the file vector.txt
    # that has all the values of the screenshot
    file = open("vector.txt", "r")
    lines = file.read()
    file.close()

    # Access the dictionary
    a = solverGrid(lines)
    b = sorted(a.items())

    # Save the dictionary solution
    np.save('Solution', b)
Paso 5: la interfaz
mejora la forma en que se muestra la solución en comparación con la captura de pantalla original.
Código:
python
#/Interface.py /
import numpy as np
import matplotlib.pyplot as plt
import cv2

# Read dictionary from Solution.npy
readDictionary = np.load('Solution.npy')
values = (readDictionary[:, 1])

# Read vector.txt
file = open("vector.txt", "r")
lines = file.read()
file.close()

# Read the path of the image the we want to analyze
fileTxt = open("image.txt", "r")
pathGlobal = fileTxt.read()
fileTxt.close()

# Obtain the coordinates to be able to
# locate them in the image
row = ["A", "B", "C", "D", "E", "F", "G", "H", "I"]
column = ["1", "2", "3", "4", "5", "6", "7", "8", "9"]

# Assign the coordinates of each number within the image plane
def coordinate():
    positionx = list()
    positiony = list()

    for k in range(9):
        for i in range(9):

            if (row[k] == "A"): y = 270
            elif (row[k] == "B"): y = 350
            elif (row[k] == "C"): y = 430
            elif (row[k] == "D"): y = 510
            elif (row[k] == "E"): y = 590
            elif (row[k] == "F"): y = 670
            elif (row[k] == "G"): y = 750
            elif (row[k] == "H"): y = 830
            elif (row[k] == "I"): y = 915

            if (column[i] == "1"): x = 19
            elif (column[i] == "2"): x = 98
            elif (column[i] == "3"): x = 182
            elif (column[i] == "4"): x = 261
            elif (column[i] == "5"): x = 335
            elif (column[i] == "6"): x = 419
            elif (column[i] == "7"): x = 499
            elif (column[i] == "8"): x = 580
            elif (column[i] == "9"): x = 660

            positionx.append(x)
            positiony.append(y)

    return (positionx, positiony)

# Function to write value in each box in the image
def writeValue(image, valor, x, y):

    font = cv2.FONT_HERSHEY_SIMPLEX
    text = str(valor)

    # Write text in the image
    cv2.putText(image, text, (x, y), font, 2, (255, 0, 0), 5)
    # cv2.putText(image, text, (coordinates), size font, (color RGB), thickness)

    return image

# Load image
image = cv2.imread(pathGlobal)
image2 = image.copy()

# Load coordinates
positionx, positiony = coordinate()

for i in range(81):
    if (lines[i] == "."):
        image = writeValue(image, values[i], positionx[i], positiony[i])

# Concatenate images horizontally
image = np.concatenate((image2, image), axis = 1)

# Show image concatenation
plt.imshow(image)
plt.axis("off")
plt.show()

# Save image
cv2.imwrite("./Interface / example.png", image)
Producción:
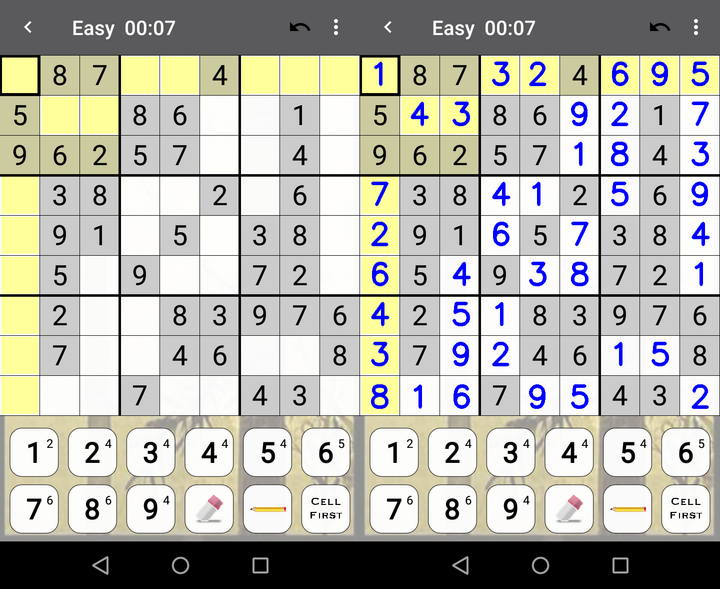
Resultados para foto1.png
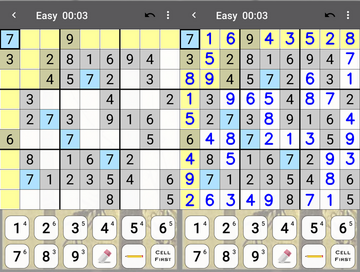
Resultados para foto2.png
Todas las imágenes para el entrenamiento del algoritmo KNN y las capturas de pantalla de ejemplo se pueden encontrar en el repositorio dado
Publicación traducida automáticamente
Artículo escrito por cabustillo13 y traducido por Barcelona Geeks. The original can be accessed here. Licence: CCBY-SA