Android TextSwitcher es un widget de interfaz de usuario que contiene varios textView y muestra uno a la vez. Textswitcher es una subclase de View Switcher que se usa para animar un texto y mostrar el siguiente. En general, usamos TextSwitcher de dos maneras, manualmente en el diseño XML y mediante programación en el archivo Kotlin. Deberíamos definir un componente XML para usar TextSwitcher en nuestra aplicación de Android.
XML
<TextSwitcher android:id="@+id/imgSw"
    android:layout_width="match_parent"
    android:layout_height="250dp">
</ImageSwitcher>
Primero, creamos un nuevo proyecto siguiendo los siguientes pasos:
- Haga clic en Archivo , luego en Nuevo => Nuevo proyecto .
- Después de eso, incluya el soporte de Kotlin y haga clic en siguiente.
- Seleccione el SDK mínimo según su conveniencia y haga clic en el botón siguiente .
- Luego seleccione la actividad vacía => siguiente => finalizar .
Diferentes atributos del widget TextSwitcher
| atributos XML | Descripción |
|---|---|
| android: identificación | Se utiliza para especificar el id de la vista. |
| Android: al hacer clic | Se utiliza para especificar la acción cuando se hace clic en esta vista. |
| android:fondo | Se utiliza para establecer el fondo de la vista. |
| Android: relleno | Se utiliza para establecer el relleno de la vista. |
| Android: visibilidad | Se utiliza para establecer la visibilidad de la vista. |
| Android: en Animación | Se utiliza para definir la animación que se utilizará cuando se muestre la vista. |
| android:fueraAnimación | Se utiliza para definir la animación que se utilizará cuando la vista esté oculta. |
| android:animateFirstView | Se utiliza para definir si animar la vista actual cuando se muestra por primera vez la animación de la vista. |
Modificar archivo activity_main.xml
En este archivo, usamos TextSwitcher y Buttons y también configuramos sus atributos.
XML
<?xml version="1.0" encoding="utf-8"?>
<androidx.constraintlayout.widget.ConstraintLayout
    xmlns:android="http://schemas.android.com/apk/res/android"
    xmlns:app="http://schemas.android.com/apk/res-auto"
    xmlns:tools="http://schemas.android.com/tools"
    android:layout_width="match_parent"
    android:layout_height="match_parent"
    android:orientation="vertical">


    <TextSwitcher
        android:id="@+id/textSwitcher"
        android:layout_width="match_parent"
        android:layout_height="wrap_content"
        android:layout_marginLeft="32dp"
        android:layout_marginTop="32dp"
        android:layout_marginRight="32dp"
        app:layout_constraintLeft_toLeftOf="parent"
        app:layout_constraintRight_toRightOf="parent"
        app:layout_constraintTop_toTopOf="parent" />

    <Button
        android:id="@+id/prev"
        android:layout_width="wrap_content"
        android:layout_height="wrap_content"
        android:layout_marginStart="32dp"
        android:layout_marginTop="128dp"
        android:text="@string/prev"
        app:layout_constraintRight_toLeftOf="@id/next"
        app:layout_constraintStart_toStartOf="parent"
        app:layout_constraintTop_toBottomOf="@+id/textSwitcher" />

    <Button
        android:id="@+id/next"
        android:layout_width="wrap_content"
        android:layout_height="wrap_content"
        android:layout_marginEnd="32dp"
        android:text="@string/next"
        app:layout_constraintEnd_toEndOf="parent"
        app:layout_constraintHorizontal_bias="1.0"
        app:layout_constraintStart_toEndOf="@+id/prev"
        app:layout_constraintTop_toBottomOf="@id/textSwitcher"
        app:layout_constraintTop_toTopOf="@+id/prev" />

</androidx.constraintlayout.widget.ConstraintLayout>
Actualizar el archivo strings.xml
Aquí, actualizamos el nombre de la aplicación usando la etiqueta de string.
XML
<resources>
    <string name="app_name">TextSwitcherInKotlin</string>
    <string name="next">Next</string>
    <string name="prev">Prev</string>
</resources>
Acceda a TextSwitcher en el archivo MainActivity.kt
Primero, declaramos una array de idiomas que contiene la lista de idiomas utilizados para textView.
private val textList = arrayOf("Java","Python","Kotlin","Scala","C++")
luego, accedemos al TextSwitcher desde el diseño XML y establecemos atributos como el color del texto, el tamaño del texto.
val textSwitcher = findViewById<TextSwitcher>(R.id.textSwitcher)
Kotlin
package com.geeksforgeeks.myfirstkotlinapp

import androidx.appcompat.app.AppCompatActivity

import android.os.Bundle
import android.view.Gravity
import android.view.animation.AnimationUtils
import android.widget.Button
import android.widget.TextSwitcher
import android.widget.TextView
import android.graphics.Color


class MainActivity : AppCompatActivity() {

    private val languages = arrayOf("Java","Python","Kotlin","Scala","C++")
    private var index = 0

    override fun onCreate(savedInstanceState: Bundle?) {
        super.onCreate(savedInstanceState)
        setContentView(R.layout.activity_main)

        // accessing the TextSwitcher from XML layout
        val textSwitcher = findViewById<TextSwitcher>(R.id.textSwitcher)
        textSwitcher.setFactory {
            val textView = TextView(this@MainActivity)
            textView.gravity = Gravity.TOP or Gravity.CENTER_HORIZONTAL
            textView.textSize = 32f
            textView.setTextColor(Color.BLUE)
            textView
        }
        textSwitcher.setText(languages[index])

        val textIn = AnimationUtils.loadAnimation(
            this, android.R.anim.slide_in_left)
        textSwitcher.inAnimation = textIn

        val textOut = AnimationUtils.loadAnimation(
            this, android.R.anim.slide_out_right)
        textSwitcher.outAnimation = textOut

        // previous button functionality
        val prev = findViewById<Button>(R.id.prev)
        prev.setOnClickListener {
            index = if (index - 1 >= 0) index - 1 else 4
            textSwitcher.setText(languages[index])
        }
        // next button functionality
        val button = findViewById<Button>(R.id.next)
        button.setOnClickListener {
            index = if (index + 1 < languages.size) index + 1 else 0
            textSwitcher.setText(languages[index])
        }
    }
}
Archivo AndroidManifest.xml
XML
<?xml version="1.0" encoding="utf-8"?>
<manifest xmlns:android="http://schemas.android.com/apk/res/android"
package="com.geeksforgeeks.myfirstkotlinapp">

<application
    android:allowBackup="true"
    android:icon="@mipmap/ic_launcher"
    android:label="@string/app_name"
    android:roundIcon="@mipmap/ic_launcher_round"
    android:supportsRtl="true"
    android:theme="@style/AppTheme">
    <activity android:name=".MainActivity">
        <intent-filter>
            <action android:name="android.intent.action.MAIN" />

            <category android:name="android.intent.category.LAUNCHER" />
        </intent-filter>
    </activity>
</application>

</manifest>
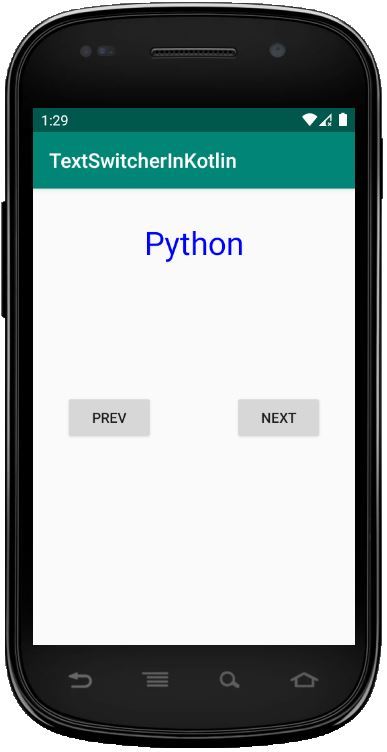
Ejecutar como emulador:
Haga clic en el siguiente botón y luego obtendremos el otro texto en TextView.

Publicación traducida automáticamente
Artículo escrito por Praveenruhil y traducido por Barcelona Geeks. The original can be accessed here. Licence: CCBY-SA